
Homes of the next generation will become more and more self-controlled and mechanized because of the solace it gives, particularly when utilized in a private home. A Home automation system implies the users control electric appliances of varying kinds. We’re working on a device that fits in the palm of your hand and can be used to operate nearly all of the devices in your room.

This proposed IoT-based House Automation system proposes to operate home appliances remotely utilizing an Arduino board with Bluetooth and any Android OS smartphone. Houses are becoming smarter as technology progresses. Modern homes are gradually moving away from traditional switches and are moving towards a centralized control system with remote switches.
WHAT IS A HOME AUTOMATION SYSTEM?
Home Automation system, as the name proposes intends to control all the devices of your smart home through internet protocols or cloud-based computing. It brings the control of working your consistently home electrical machines to the tip of your finger, in this way giving clients reasonable lighting arrangements, better energy protection with ideal utilization of energy.

Apart from just lighting solutions, the concept also further extends to having overall control over your home security as well as building a centralized home entertainment system, and much more.
Proposed System
Time is really valuable. Everyone wants to save as much time as possible. New technologies are being developed to help us save time. We are introducing a Home Automation system that uses Bluetooth to save people’s time. This device allows you to operate your household appliances from your smartphone. Within the range of your household appliances, you can turn them on and off.

We’ve developed a new Arduino-based home automation system that uses Bluetooth. This technology is extremely cost-effective, allowing users to control any electrical equipment without the need for remote control. This project allows the user to use his or her smartphone to control all electronic equipment.
To design Home Automation Using Arduino, You Will Need The Following Things:
Hardware Required
- Keyboard
- Door Lock Actuator
- Arduino Board
- Relay Modules
- Smart Phone
- LCD Display
- Sim800l GSM Module
Software Part
- Arduino IDE
- Support From Me
The first thing that will come into mind when creating a home automation system is a door. A door lock sensor, GSM module, Arduino, and a keyboard are required to secure the door.
Door System Automation
Don’t you want to open your flat door as soon as you walk in? There are two ways to do this work. The first is to simply text your system that you have arrived at your destination. Another alternative is to type the password in manually.
In the first technique, the SIM800l module attached to the Arduino board receives a text message from the user, which is then validated by the Arduino, which unlocks the door if the message is found to be valid.

Regarding the second task, you must mount the keypad outside the door, and when the user enters the passkey using the keypad, the Arduino program will verify that the passkey is correct. Otherwise, it will turn on the burglar alarm.
Use Of Relay Module In Home automation
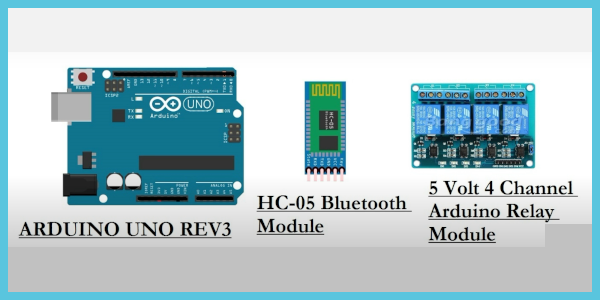
We’ve automated the door system up to this point. The next step is to automate the Your home’s lights and air conditioners. But, before we proceed, I must tell you that if you do not take the required precautions, it can be extremely dangerous. Still, now we were working with DC, but now we’ll be dealing with 230V AC. So, how do you use a DC-powered Arduino to operate AC devices? A relay module is an answer to this question.
Relays are electrically operated devices that may open or close contacts electronically. It can be used to turn on or off (make or break) circuits, control multiple circuits with a single signal, or control high-power circuits using low-power signals.
Use of HC-05 Bluetooth Technolgy In Home Automation
Since your smartphone has Bluetooth capabilities, you can utilize it to communicate with your Arduino. You just need to establish communication between the Arduino and the smartphone, and then use the code of HC-05 to control everything with your fingers.

Apart from that, you can use the PIR sensor to detect movement and, depending on the information provided by the sensor, you can do a variety of things.
Code for PIR sensor
int relay = 11; int sensor = 8; int led = 13; void setup() { pinMode(relay, OUTPUT); pinMode(sensor, INPUT); pinMode(led, OUTPUT); digitalWrite(relay,LOW); digitalWrite(sensor,LOW); digitalWrite(led,LOW); while(millis()<13000) { digitalWrite(led,HIGH); delay(50); digitalWrite(led,LOW); delay(50); } digitalWrite(led,HIGH); } void loop() { if(digitalRead(sensor)==HIGH) { digitalWrite(relay,HIGH); delay(3000); digitalWrite(relay,LOW); while(digitalRead(sensor)==HIGH); } } // This is a sample code please modify it as per your requirement |
Online Home Automation
So far we had talked about offline automation; when it comes to online automation the first thing you’ll need is a cloud server, which you may believe will be prohibitively expensive. But don’t worry, there are plenty of free and safe servers on the market to help you get your home automation system online. One of them is Blink Server.
After that, you’ll need internet access, which you may get with the ESP WI-FI module. The WI-FI module will be linked to your home router and will give your Arduino board Internet access. Once you have everything ready in your hand, you will have to install the Blink program on your smartphone, after which, based on user input, the app will transmit the data to the cloud and the cloud will interface with the Arduino via the API that you used in your Arduino code. That’s all; you’re now ready to control your home appliances from afar.
ConclusionHope you have understood all the basic things related to Home automation technology. We MATHA ELECTRONICS will be back soon with more informative blogs soon.