
How to Setup Raspberry Pi Pico Serial Programming? USB Serial output

In this article, we’ll see how to display some text on the Raspberry Pi Pico’s Serial Port. This guide only applies if you’re using the official SDK to program your Raspberry Pi Pico in C. We will go over every step required to program a Raspberry Pi Pico serially and print the message “Hello, World!” on the serial output.

Serial Port of Raspberry Pi Pico
The logical next step after using the Raspberry Pi Pico to blink an LED is to utilize the serial port to print some text, like Hello World, for instance. The procedure by which the Raspberry Pi Pico transfers data to the serial port, rather than the text written through the serial port, is what matters in this situation.
The Raspberry Pi Pico Serial C SDK has the wonderful feature of defining’stdio’ type functions like ‘printf’ for us to use.
We must first gain a basic understanding of the Raspberry Pi Pico’s serial input and output in order to move on with programming the Raspberry Pi Pico Serial Port. Either USB CDC or UART can be used for the Raspberry Pi Pico’s serial input and output.

UART0 and UART1 are the Raspberry Pi Pico’s two UART peripherals. The default serial port when printing data with the “printf” function is UART and the UART0 peripheral is used in that.
A board configuration file for the Pico SDK named “pico.h” sets several of the key pins as default for various functions, including UART, the on-board LED, I2C, and SPI.
This board configuration file states that UART0 is the default UART Peripheral, UART0 TX Pin is the default GPIO 0 (GP0), and UART0 RX Pin is the default GPIO 1. (GP1). Look at the Raspberry Pi Pico’s pinout in the tutorial “Getting Started with Raspberry Pi Pico” to see all the GPIO Pins that could be set up as UART0 or UART1 pins
Exploring Hello World Example
Let’s move on to investigating the examples for serial output after the brief introduction to the Raspberry Pi Pico’s serial programming. I strongly advise you to review the preceding instruction, “Programming Raspberry Pi Pico with C,” if you haven’t already completed the initial setup for using the C SDK to programme the Raspberry Pi Pico.
I covered every step required to set up your Raspberry Pi (note: this is the Raspberry Pi Computer, not the Pico), including downloading the tools, SDK, examples, and programming the Pico using a Blinky example.
The list of all the examples is grouped into several folders and can be found in the “pico-examples” directory (which is located in /home/pi/pico). The “blink” directory was examined in the last instruction (and the corresponding source files).
cd ~
cd pico/pico-examples
ls
There is a directory called “hello world” if you look through the list of directories. The serial port programming example projects are located in this directory.

List the contents of the “hello world” directory by changing there. It has two directories, serial and USB, as you can see. Use the project in the “serial” directory if you wish to use the UART Port for serial communication. Go to the “usb” directory if you wish to use the Raspberry Pi Pico’s USB Serial option.
cd hello_world
ls

First, we’ll look at the project in the “serial” directory, which, when run, causes the Raspberry Pi Pico’s UART to display the message “Hello, world!” Switch to the “serial” directory and list the items there. There are two files in this directory called “hello serial.c” and “CMakeLists.txt.”
cd serial
ls

To view the source code for ‘hello_serial.c’, you can use vim with the help of the following command.
vim hello_serial.c
| ** | |
| * Copyright (c) 2020 Raspberry Pi (Trading) Ltd. | |
| * | |
| * SPDX-License-Identifier: BSD-3-Clause | |
| */ | |
| #include <stdio.h> | |
| #include “pico/stdlib.h” | |
| int main() { | |
| stdio_init_all(); | |
| while (true) { | |
| printf(“Hello, world!\n”); | |
| sleep_ms(1000); | |
| } | |
| return 0; | |
| } |
NOTE: To exit from vim, type ‘:q’.
The code is really easy to read. The application outputs ‘Hello, world!’ text constantly with a delay of 1000 ms after some device initialization (for UART or USB). If you look at the code, neither the UART nor the USB are mentioned. CMake’s configuration is the cause of this.
We can choose between setting the output of serial to UART or USB CDC using CMake directives (or both). In reality, you may see two files—”CMakeLists.txt” and “hello usb.c”—if you enter the “usb” directory in the “hello world” directory. The contents of “hello usb.c” and “hello serial.c” are identical.
The corresponding “CMakeLists.txt” file in each directory is where the difference can be found. You can essentially enable UART or USB as serial output merely by configuring the “CMakeLists.txt” file, without ever touching the source code.
Exploring CMakeLists File
Open the “CMakeLists.txt” file in vim in the “hello world” directory’s “serial” directory. For your reference, I copied the contents of “CMakeLists.txt.”
| add_executable(hello_serial | |
| hello_serial.c | |
| ) | |
| # Pull in our pico_stdlib which aggregates commonly used features | |
| target_link_libraries(hello_serial pico_stdlib) | |
| # create map/bin/hex/uf2 file etc. | |
| pico_add_extra_outputs(hello_serial) | |
| # add url via pico_set_program_url | |
| example_auto_set_url(hello_serial) |
There is nothing noteworthy in this “CMakeLists.txt” file because the SDK’s default configuration uses the UART0 as the serial port. We must look at the ‘CMakeLists.txt’ file in the ‘usb’ directory of the ‘hello world’ directory if we want to view the real CMake directive that enables and/or disables UART and USB.
Use the commands below to navigate to the “usb” directory and open the “CMakeLists.txt” file there, assuming you are now in the “hello world” directory’s “serial” directory.
cd ..
cd usb
ls
vim CMakeLists.txt

I copied the contents of ‘CMakeLists.txt’ in ‘usb’ directory for your reference.
| if (TARGET tinyusb_device) | |
| add_executable(hello_usb | |
| hello_usb.c | |
| ) | |
| # Pull in our pico_stdlib which aggregates commonly used features | |
| target_link_libraries(hello_usb pico_stdlib) | |
| # enable usb output, disable uart output | |
| pico_enable_stdio_usb(hello_usb 1) | |
| pico_enable_stdio_uart(hello_usb 0) | |
| # create map/bin/hex/uf2 file etc. | |
| pico_add_extra_outputs(hello_usb) | |
| # add url via pico_set_program_url | |
| example_auto_set_url(hello_usb) | |
| elseif(PICO_ON_DEVICE) | |
| message(WARNING “not building hello_usb because TinyUSB submodule is not initialized in the SDK”) | |
| endif() |
For your reference, I copied the contents of the “CMakeLists.txt” file under the “usb” directory.
pico_enable_stdio_usb(hello_usb 1)
pico_enable_stdio_uart(hello_usb 0)
These lines will enable printf output via USB and disable printf output via UART.
NOTE: In the future projects, if you want to enable ‘printf’ output via USB, then you have to include these lines in the corresponding ‘CMakeLists.txt’ file of that project.
Building Hello World Example
Let’s go on to constructing the projects in the “hello world” directory now that we have seen how to configure CMake to set the output as either UART or USB. The build method is the same as the “Blink” project, if you recall.
Change to the “hello world” directory by going to the “build” directory in the “pico-examples” directory.
cd ~
cd pico/pico-examples
ls
cd build
ls
cd hello_world

Use the make command to launch the building process. The -j option also allows you to optionally define the number of concurrent jobs.
make -j4

The build will be completed in a few seconds. This will create the “serial” and “usb” examples found in the “hello world” directory.

Change to the build directory for the specific project to see the list of generated files. Let’s use the files generated for the “usb” case as an example.
ls
cd usb
ls
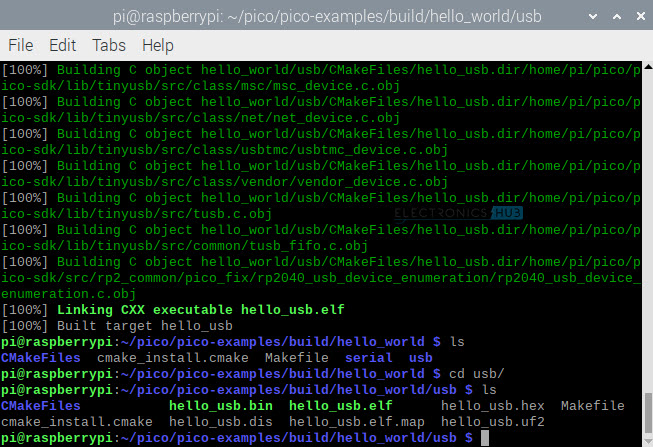
You can see the following four target files for ‘usb’ example project:
- hello_usb.bin
- hello_usb.elf
- hello_usb.hex
- hello_usb.uf2
Similarly, the ‘serial’ project also consists of four target files in the ‘/pico/pico-examples/build/hello_world/serial’ directory.
- hello_serial.bin
- hello_serial.elf
- hello_serial.hex
- hello_serial.uf2
Flashing Raspberry Pi Pico
We’ll use the USB example because it makes it easier to see the serial output. In the earlier tutorials, I previously covered how to upload the software to the Raspberry Pi Pico. However, I’ll briefly go through each step once more as a reminder.
When connecting the Raspberry Pi Pico to the host computer, keep pressing the “BOOTSEL” button (Raspberry Pi in my case). By doing this, the Raspberry Pi Pico will take on the appearance of the RPI-RP2 portable storage device.
I also covered a quick hack that makes it unnecessary to unplug and replug the Raspberry Pi Pico every time you want to upload a software by adding a push button to reset it.
Drag and drop the “hello usb.uf2” file into the RPI-RP2 device from the Hello World USB project build directory (home/pi/pico/pico-examples/builds/hello world/usb). After restarting, the Raspberry Pi Pico begins running the programme.

How to See USB Output?
We are aware that the Raspberry Pi Pico began executing the programme after being flashed. But how do you view the USB output? Minicom is a unique tool that is required. Use the following command in the terminal to install “minicom.”
sudo apt install minicom

Minicom has already been installed on my computer (a Raspberry Pi).
Type the following command into the terminal to start the serial port
minicom -b 115200 -o -D /dev/ttyACM0
When you press enter, minicom starts a serial port with a baud rate of 115200, and you can immediately see the message “Hello, world!” being printed repeatedly.

Press Ctrl+a and X to end minicom.
Note: Since utilising USB is so simple, I haven’t covered how to view the Raspberry Pi Pico’s output over UART. However, I will update this article with a new part on serial output on the Raspberry Pi Pico’s UART if you are also interested in it.
ConclusionI hope all of you understand the basics of Raspberry Pi Pico Serial Port Programming. We MATHA ELECTRONICS will be back soon with more informative blogs soon.