
Ultrasonic sensors are used around the world, indoors and outdoors in the harshest conditions, for a variety of applications.Ultrasonic sensors have been used around for decades,only because of their capabilities, flexibility, and low cost., they continue to dominate the sensing business. With their integration in robotics, autonomous cars, and drones, demand has grown even more and more. This tutorial was written to provide an overview of ultrasonic sensing, its concepts, and how to interface ultrasonic sensors with Raspberry Pi.

Introduction to Ultrasonic Sensor
An ultrasonic sensor is an electronic device that uses ultrasonic sound waves to detect the distance between a target item and converts the reflected sound into an electrical signal. Ultrasonic waves travel quicker than audible sound waves (i.e. the sound that humans can hear). Ultrasonic sensors have two main components: the transmitter (which emits the sound using piezoelectric crystals) and the receiver (which encounters the sound after it has traveled to and from the target).

The sensor sends an ultrasonic pulse out at 40kHz which travels through the air and if there is an obstacle or object, it will bounce back to the sensor. By calculating the travel time and the speed of sound, the distance can be calculated.
Distance = Time x Speed
Time – Time that is taken by the sound wave to reach the receiver
Speed – Speed of the sound wave.
Hardware Required
- Voltage Level Converter
- Ultrasonic Sensor-HC-SR04
- 5v 3Amp Raspberry Pi Power Adapter
- Raspberry Pi 4
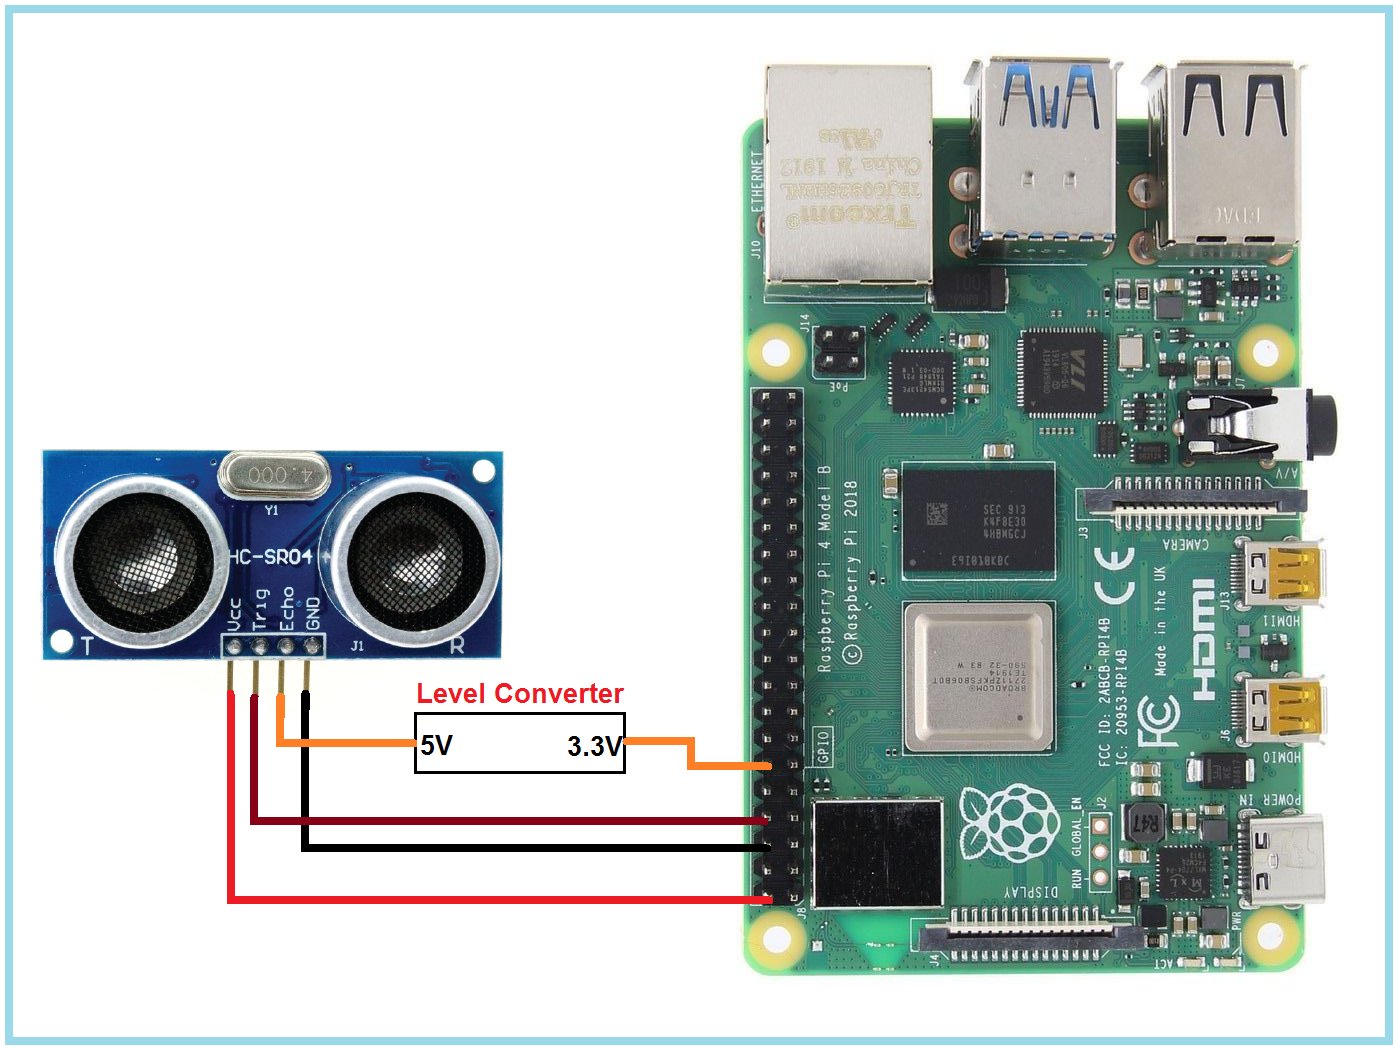
Interfacing Of The Ultrasonic Sensor With The Raspberry PI 4 GPIO-
Ultrasonic sensors include a transmitter (Trigger) for transmitting infrared sound waves and a receiver for receiving reflected sound waves (ECHO pin). It also contains two power pins, VCC and GND. The pinout of the ultrasonic sensor and its connection to the Raspberry Pi are shown in the diagram below.
Python Code For The Ultrasonic Sensor
The first line of code begins by importing modules that can be used to work with the Raspberry Pi’s GPIO pins.
| import RPi.GPIO as GPIO import time |
RPi.GPIO – This module allows us to communicate with the Raspberry Pi’s GPIO pins
Time – The Time Module is used to add a delay between transmitting and receiving infrared sound waves.
| GPIO.setmode(GPIO.BCM) |
The GPIO SetMode is used to establish the numbering scheme that is used to work on the Raspberry Pi GPIO, and there are two ways to do so: GPIO.board and GPIO.BCM.

GPIo.Board – If you want to refer to the pin with the number indicated in the circle, you can use the GPIO.setmode (GPIO.board) method
GPIO.setmode(GPIO.BCM) – BCM is an acronym for Broadcom chip-specific number. If you want to refer to a pin number representing a rectangle you can use GPIO.SetMode (GPIO.BCM).
Basically I like to use GPIO.setmode(GPIO.BCM) method as it comes in handy when working on communication protocols such as Serial, SPI, I2C, etc.
| GPIO.setmode(GPIO.BCM) |
These lines of code are used for initialization of PINs, to which we will connect the ultrasonic sensor.
| GPIO.setup(GPIO_ECHO, GPIO.IN) GPIO.setup(GPIO_TRIG, GPIO.OUT) |
This line of code used to set the Raspberry Pi’s pins as INPUTS or OUTPUTS.
Distance Calculation Python Code
| GPIO.output(GPIO_TRIG, GPIO.LOW) Time.sleep(2) |
We’re using the above line of code to set the GPIO pin low for 2 milliseconds, as specified in the datasheet for this ultrasonic sensor.
Time.sleep(2) – This line of code introduces the delay in the process.
| GPIO.output(GPIO_TRIG, GPIO.HIGH) time.sleep(0.00001) GPIO.output(GPIO_TRIG, GPIO.LOW) |
As per the datasheet of the sensor we are introducing the delay in between making GPIO_TRIG pin high and low.
| while GPIO.input(GPIO_ECHO)==0: start_time = time.time() while GPIO.input(GPIO_ECHO)==1: Bounce_back_time = time.time() pulse_duration = Bounce_back_time – start_time distance = round(pulse_duration * 17150, 2) |
Note that the above print method will not work if you are not using Python 3.0 or higher. In that situation, use the following line to change the print line.
| print (“Distance:”,distance,”cm”) |
We’re estimating the time it takes for the pulse to return to the receiver after hitting an object in the above line of code, and we’ve set the pulse duration variable to that value. This variable keeps track of how long it takes the sound wave to return.
If you add all the above lines of code you will get the following code.
| import RPi.GPIO as GPIO import time GPIO.setmode(GPIO.BCM) GPIO_TRIG = 11 GPIO_ECHO = 18 GPIO.setup(GPIO_TRIG, GPIO.OUT) GPIO.setup(GPIO_ECHO, GPIO.IN) GPIO.output(GPIO_TRIG, GPIO.LOW) Time.sleep(2) GPIO.output(GPIO_TRIG, GPIO.HIGH) Time.sleep(0.00001) GPIO.output(GPIO_TRIG, GPIO.LOW) while GPIO.input(GPIO_ECHO)==0: start_time = time.time() while GPIO.input(GPIO_ECHO)==1: Bounce_back_time = time.time() pulse_duration = Bounce_back_time – start_time distance = round(pulse_duration * 17150, 2) print (f”Distance: {distance} cm”) GPIO.cleanup() |
Conclusion
In this article, we learned the interfacing of ultrasonic sensors with Raspberry Pi GPIO 4 pins. Hope you all liked this. Will be back soon with more interesting blogs soon