
How to make Final Connections to a Quadcopter?
We are living in a technology-based society where we have lots of innovative ideas day by day. These new innovations in electronics projects come as an ever-growing network that strives constantly to share and gather insight on the latest trends in the industrial Platform. Making a quadcopter is a popular hobby these days, and an increasing number of individuals are devoting their time to learning about its components and attempting to build one.

Quadcopters are becoming increasingly common as sensors and control systems become more advanced. In this tutorial, we will be looking at the final connections to be made to make your quadcopter flying ready.
.
Final Connection of a Quadcopter
Step 1 – Solder the Input Power Cable and ESC’s power cable-
- Begin by soldering the ESCs to the bottom plate, as well as the battery connector.
- The frame we’re utilizing has a built-in power distribution system. Thus, just the Power Cable (to which the battery will be connected) and the ESC’s power input pins must be soldered.
- Perfectly solder it. Ensure that the +ve (red wire) and -ve (black wire) are soldered in the correct locations.
.


Step 2 – Making Connections and Assemble the Quad (Upper, Lower Frame, and 4 legs)-
- Prepare the frame. Make sure the screws are properly tightened.

- Install the motors on the arms and connect all of the wires.
- Assemble the motors in the following configuration.

- Assemble the ESC and APM connections as shown. Quad X is something we’re working on.

- Connect all the components correctly.

- Use Zip Tie Cables to secure everything so that nothing gets in the way of the propeller.
- Using double-sided tape, adhere the APM and Reciever to the frame.
Step 3 – Making Sure that Everything is working fine –
- The frame has been assembled, and the connections have been completed.
- Check to see if propellers have been installed yet.
- Arm the Quadcopter by connecting the battery.
- Give it a good throttling. Make sure that all of the motors turn on at the same time.
- Take the Quad and bend it in your hand. You should be able to feel the effect of changing the motor’s rotational speed.
- If you bend it to the left, the two left motors should accelerate while the two right motors slow down, resulting in quad stability.
- Make sure everything is in working order by repeating the process in all directions.
- Now you may place the propellers on your Quad and fly it in the open ground (Fly it in open space only as no one should get hurt if anything goes wrong)
Step 4 – Flying Directions –
- Here are some flying instructions that everyone should be aware of before flying
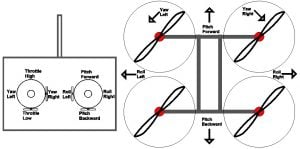
- Increase the Throttle slowly at all times.
- You may also use your Transmitter and laptop to virtually simulate to improve your skills. It will be the most effective method of flying practice.

Conclusion
Hope this blog helps you to understand how to make the final connections of a quadcopter. We, MATHA ELECTRONICS will come back with more informative blogs.