
How to Use Raspberry Pi Imager?
Generally Win32Disk Imager and Balena etcher have been used by everyone. I prefer Win32Disk Imager, but I may have to change my mind now. We’ve simplified the process of imaging your microSD card with Raspbian, the Raspberry Pi’s primary operating system, and alternative operating systems. Raspberry Pi Imager, our new imaging tool, is now available. Let’s look at the Raspberry Pi imager tool now.
How it works?
The Raspberry Pi Imager simplifies the imaging process. It combines all of the most often used imaging tools and applications into a single package. Raspbian and a few additional operating systems are included in Raspberry Pi Imager. You can use the custom image tool to add your own photos if something isn’t listed.
The Raspberry Pi Imager
Ease is necessary
I’ve always wished for people to be able to quickly get started with their Raspberry Pi. They’ve made it a lot easier for us to flash an SD card now. Balena Etcher used to have some issues with flashing and wouldn’t flash properly on occasion. (as heard by clients) For years, I’ve been using Win32 Disk Imager. It hasn’t caused me any problems. Let’s have a look at this one now.
Things get wild sometimes
Flashing microSD cards with your preferred operating system can be challenging.People that use different operating systems, such as Windows, macOS, and Linux, all utilize different methods of accessing the SD card, which is ineffective. And, for some new Raspberry Pi users, understanding where to find the latest up-to-date image and how to get it onto the microSD card can be a bit complicated, unless you’ve had little experience with image-flashing tools such as Etcher or win32diskimager.
As a result, they’ve always recommended getting a pre-loaded NOOBS SD card from a Raspberry Pi Approved Reseller.
Raspberry Pi Imager
- From Now on, Raspberry Pi users will be able to download and utilize the new Raspberry Pi Imager, available for Windows, macOS, and Ubuntu.
- Because of various shortcuts they’ve added to the process, the utility is simple to use and extremely fast.
- To begin, Raspberry Pi Imager gets a.JSON file from their website that contains a list of all current download options, ensuring that you always have the most up-to-date version installed.
How to use this new Raspberry Pi Imager tool?
Choose OS
- To begin, you must first download it (which you can from this link). To continue, click the Choose OS button once it has been installed.
List of OS
- For the Raspberry Pi 4 Boot problem, you will now see a list of operating systems, formatting options, and EEPROM recovery options. I’d like to write a separate blog about the Raspberry Pi 4 boot issue, as I’ve noticed that many people are having trouble with it. We’ll discuss it in another blog.
- Simply choose your preferred operating system, whether it’s Raspbian or LibreELEC.
Custom OS
- One Extra option you get is to flash a custom image like ubuntu core, ubuntu mate, windows core, etc…
choosing sd card
- Now click on the choose SD card button.
selecting sd card
- Choose an SD card. Mine is a 32GB Class 10 drive. The more advanced the class, the better the Pi’s performance.

- Click on the write button after this.
writing the image
- Now the imager will start writing into the sd card.
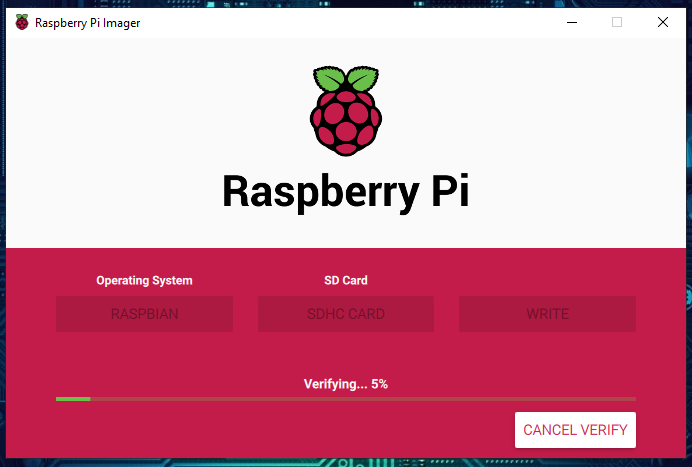
verifying the image
- Once written it will verify to make sure the OS is properly put.
Final dialog
- When you select proceed, the last window will appear, and the micro SD card will be auto-ejected.
- If you’re still unsure, watch this video provided by the Raspberry Pi Foundation.
Imager internals
Once you’ve chosen an operating system from the drop-down menu, the utility downloads the necessary file from their website and writes it to the SD card.
This speeds up the process quite considerably compared to the standard process of downloading it from the website, writing it to a file on your hard drive, and then, as a separate step, reading it back from the hard drive and writing it to the SD card.
Raspberry Pi Imager also stores the downloaded operating system image to your local drive during this procedure, allowing you to flash many cards without having to download the file again.Hope this blog helps you to understand how to Use Raspberry Pi Imager. We ,MATHA ELECTRONICS will come back with more informative blogs.