
Programming Raspberry Pi Pico using C

This article will teach us how to use C to program the Raspberry Pi Pico. We will go over every step needed to program the Raspberry Pi Pico in C, including downloading the SDK and example code for the C programming language from GitHub, setting up all the required tools, creating the Blinky C program, and finally loading the UF2 file onto the Pico and running the Blinky example.
Getting Started with Raspberry Pi Pico C SDK
If you’re an old-school hardware engineer (like I am) and have expertise creating firmware, you’ll probably feel more at home building software in the C programming language than in Python or MicroPython. Ironically, C is used to write MicroPython.

Despite the Raspberry Pi Foundation’s promotion of Python as the primary programming language for all Raspberry Pi SBCs, microcontrollers operate in a very different manner.
Out of all the high-level programming languages, I think of C as being the lowest level. C is the best option if you want total control over the hardware, down to the last bit of a register. As a result, C is frequently chosen as the programming language for microcontrollers and embedded devices.
This also applies to the Raspberry Pi Pico with the RP2040 Microcontroller. The Raspberry Pi Foundation published SDK (Software Development Kit) for C / C++ programming languages to develop applications for RP2040 based boards in addition to funding and supporting MicroPython.
Let’s examine how to use the C programming language to programme the Raspberry Pi Pico.
What Computer to use?
Any Linux, Windows, or Mac machine can serve as the host computer. However, the primary host system for the Raspberry Pi Pico is the Raspberry Pi Computer running Raspberry Pi OS (even though it mentions procedures for other systems).

I own an older Raspberry Pi 3 Model B rather than the most recent Raspberry Pi 4 SBC. Therefore, I typically utilise a Raspberry Pi to create Pico applications when using the C SDK. I’ll cover how to operate in different contexts and platforms, including Windows, Visual Studio Code, and others, in upcoming tutorials.
Get Pico’s C SDK and Examples
SSH or VNC should be used to log into your Raspberry Pi computer, assuming you are doing so as well (if you connect Pi to a monitor, then well and good). I’ll open the Raspberry Pi desktop using the VNC viewer.
Create a directory called “pico” at /home/pi/pico by opening the terminal. The following commands should be entered one after another.
cd ~/
mkdir pico
cd pico

Download C SDK
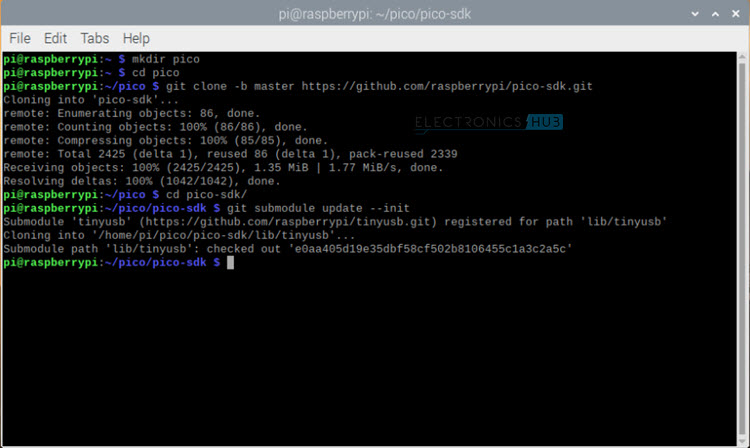
Pico’s C SDK can be found in its official repository at https://github.com/raspberrypi/pico-sdk. . Let’s use the following command to clone this repository into our freshly established “pico” directory.
git clone -b master https://github.com/raspberrypi/pico-sdk.git

By doing this, a directory called “pico-sdk” will be created inside of the “pico” directory. You must initialise the ‘tinyusb’ submodule in the ‘pico-sdk’ before downloading the examples if you want to use USB-related features like USB CDC Serial.
So, use the following instructions to initialise the USB submodule after opening the “pico-sdk” directory.
cd pico-sdk
git submodule update – -init
Download Examples
Numerous examples for several Pico peripherals, including GPIO, ADC, PWM, I2C, SPI, etc., were produced by the Raspberry Pi Foundation. Instead of starting from scratch and building C programmes, we may use these examples to become familiar with the various APIs and functions. Pico examples’ official github repository can be found athttps://github.com/raspberrypi/pico-examples.
This repository will be copied into the “pico” directory. So, return to the “pico” directory and use the following commands to clone the git.
cd ..
git clone -b master https://github.com/raspberrypi/pico-examples.git

Setting up the Toolchain
You recently downloaded the Pico C source files. You need other tools, such as the ARM GCC Compiler, the ARM Cortex libraries, the CMake build tool, etc. to compile and build these files. ‘apt’ can be used to install each of these tools. Use the ‘update’ command to first update the package index.
sudo apt update
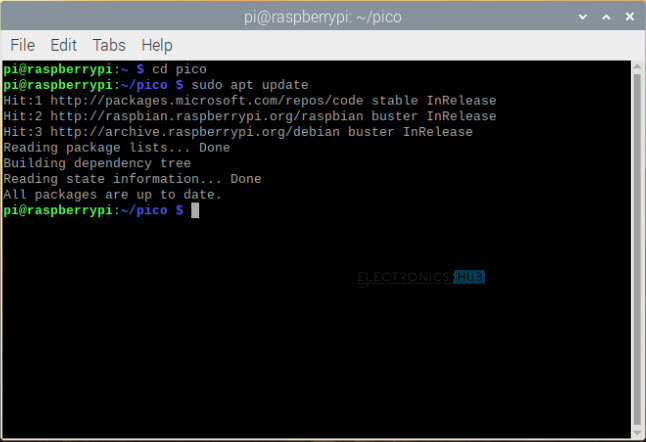
You can now use the following command to install the required tools. ‘apt’ won’t install any of these tools again if you already have them installed.
sudo apt install cmake gcc-arm-none-eabi libnewlib-arm-none-eabi build-essential

WARNING: This installation is rather huge and takes up about 1800 MB of disc space. Make sure the SD Card on which you loaded the Raspberry Pi OS has enough space. A 16 GB card was utilised.
Additionally, the full installation process will take a while. Grab a coffee and unwind.

Exploring Blink Example
Let’s examine the first C example programme, which is simply the “Blink” programme as one might anticipate. Open the “pico-examples” directory if you are still in the “pico” directory. This directory includes examples for various modules and peripherals. Go to the “blink” directory.
cd pico-examples/blink

Here, you can see the ‘blink.c’ source code for blinking the on-board LED. If you want to open it, use any editor like ‘vim’. If you don’t have ‘vim’, install it using sudo apt install vim command.
vim blink.c
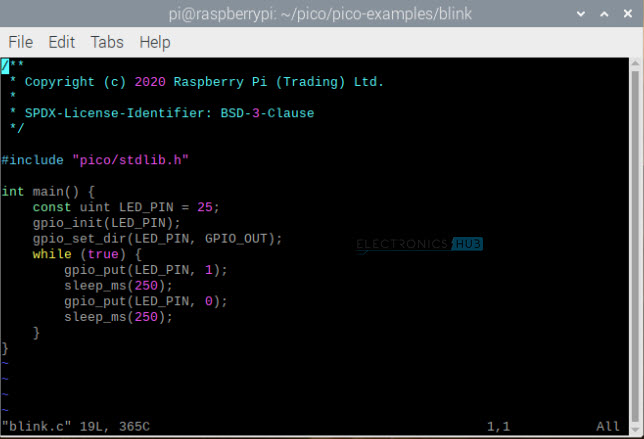
To make the code easier to read, I copied it and added comments.
| /** | |
| * Copyright (c) 2020 Raspberry Pi (Trading) Ltd. | |
| * | |
| * SPDX-License-Identifier: BSD-3-Clause | |
| */ | |
| #include “pico/stdlib.h” | |
| int main() { | |
| const uint LED_PIN = 25; /* On-board LED. Connected to GPIO 25 */ | |
| gpio_init(LED_PIN); /* Initialize GPIO function on the Pin */ | |
| gpio_set_dir(LED_PIN, GPIO_OUT); /* Set the Pin as Output */ | |
| while (true) { | |
| gpio_put(LED_PIN, 1); /* Make the GPIO Pin HIGH */ | |
| sleep_ms(250); /* Delay of 250ms */ | |
| gpio_put(LED_PIN, 0); /* Make the GPIO Pin LOW */ | |
| sleep_ms(250); /* Delay of 250ms */ | |
| } | |
| } |
Now that we have this source code, we must create a binary file.
Build the Blink
Create a new directory called “build” in the “pico-examples” directory by returning there. All of the CMake build files for every example project are located in this directory. Open the newly formed directory called “build.”
cd ..
mkdir build
cd build
Use the following command to export the path for the pico-sdk as well.
export PICO_SDK_PATH=../../pico-sdk

Now that the build directory has been prepared, you are ready to run the CMake command.
cmake ..

All the files necessary for building each example are now present in the directory labelled “build.” However, since the blink example is the only one in which we are concerned, let’s construct it using the make command. To create the files, first access the ‘build’ directory and open the ‘blink’ directory.
cd blink
make -j4

NOTE: You can define the number of concurrent jobs to run by using the ‘-j’ option. As my Raspberry Pi 3 has a quad-core CPU, I decided to run 4 operations at once.
All of the source files will be compiled using the’make’ programme, which also creates a large number of binary files.

The list of created files is visible if you list the contents of the “build” directory’s “blink” directory.

We are most interested in the “.uf2” file “blink.uf2” out of all of these. If you remember the MicroPython instruction, here is file format of the MicroPython binary which can be easily uploaded in to Raspberry Pi Pico simply by dragging and dropping (after setting the Pico in bootloader mode) (after setting the Pico in bootloader mode).
Load the Blink and Run it
Put the Raspberry Pi Pico in Bootloader mode, which will mount the Pico as a USB Mass Storage Device, for the quickest method of uploading the application. The blink.uf2 file can then be easily dropped into place.
Plug in the micro USB cable to the Raspberry Pi Pico first, then hold down the “BOOTSEL” button while connecting the USB cord to the Raspberry Pi to put the Pico in bootloader mode (or the host computer). You can mount the Pico as a mass storage device.

Navigate to the pico/pico-examples/build/blink directory by using the file manager. The ‘blink.uf2’ file can be dropped directly onto Pico. The LED starts flickering, and the Pico will reset (and become detached from the computer).

Bonus: Alternative to Unplugging and Plugging USB Cable
Have you become weary of repeatedly unplugging and replugging the Raspberry Pi Pico to activate the bootloader? After that, I’ll demonstrate a workaround so you won’t need to repeat the process each time you wish to submit a programme to Pico.
By disconnecting and replugging Pico, we are actually resetting it. So long as Pico can be reset in any other means, it can remain connected to the PC. It turns out that Pico can be reset in a quite straightforward manner.
If you recall the Raspberry Pi Pico’s pinout, there is a pin designated as “RUN.” This is the Raspberry Pi Pico’s pin 30.

Actually, the RP2040 Microcontroller’s global reset pin is located here. This pin will reset the RP2040 microcontroller if it is pulled LOW.
So I wired a push button between the GND and RUN pins. Every time I press the button, the microcontroller is reset. We will refer to this button as the reset button.

Push and hold the Reset Button first to put the Raspberry Pi Pico in Bootloader Mode. Push and hold the BOOTSEL button after that. Release the BOOTSEL button after releasing the Reset button for a brief period of time.
I’m done now. Now in bootloader mode is your Pico. You can choose to reset or choose bootloader mode while keeping the USB cord connected to Pico and the Raspberry Pi.
You only need to press the Reset Button once and let go to restart the Pico.
Conclusion
I hope all of you had understand how to get started with C SDK for Pico. We MATHA ELECTRONICS will be back soon with more informative blogs soon.