
A Beginner’s Guide for Programming Raspberry Pi Pico in Windows
This guide will walk you through the steps of installing and configuring Visual Studio Code on a Windows machine so that you can begin writing programs for the Raspberry Pi Pico. We’ll get the Windows toolchain set up, install VS Code, grab the Raspberry Pi Pico SDK, and put together a sample project using Visual Studio Code on a desktop PC.
In what ways do we need to set up new software?
Raspberry Pi Pico programming on a Windows system differs slightly from programming on a Linux (Raspberry Pi OS) system, at least in the initial setup phase, because you must download and install all the necessary tools individually rather than through simple commands.
The following resources must be obtained before installing Visual Studio Code:
- ARM GCC Compiler
- CMake
- Build Tools for Visual Studio Code
- Python
- Git
After these are set up, we can install Visual Studio Code for Windows, configure it, and begin programming the Raspberry Pi Pico.
ARM GCC Compiler
First, we’ll get the GCC Compiler for ARM Cortex Processors downloaded and installed on our Windows machine so that we can begin setting up the Raspberry Pi Pico for programming. To get the most recent Windows executable, head to the GNU Arm Embedded Toolchain download page and scroll down to the bottom.
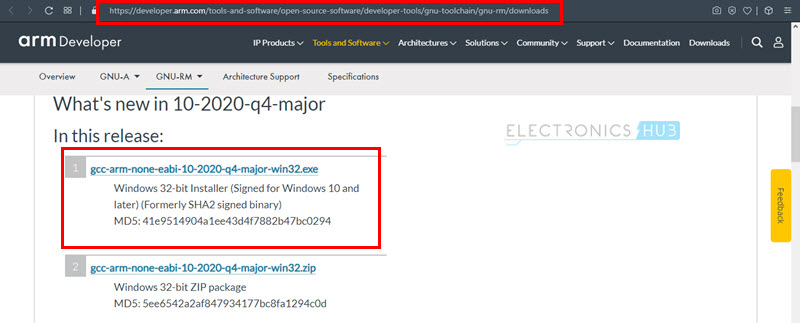
Download the executable, then go to your downloads folder and double-click it to launch the setup wizard. Easy to understand and implement, all you have to do is follow the on-screen prompts.

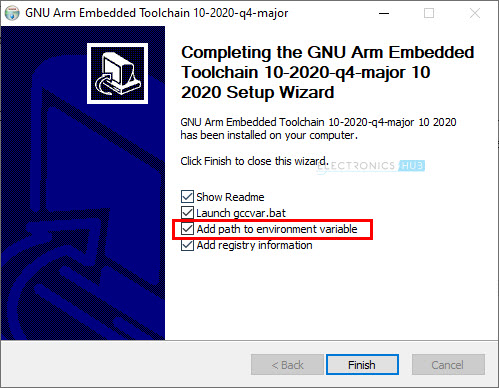
Be sure to add a path to your environment variables at the very end by selecting the corresponding box.
CMake
CMake is the next crucial tool we’ll be installing on our computers. The CMake 64-bit Windows Installer can be found in the ‘Platform’ sub-section of the official download page, below the list of available Binary distributions (.msi file).
Most Windows computers, I’m sure, are 64-bit systems, but if you happen to have a 32-bit machine, you can get the ‘i386’ Installer if you need it.

Just double-click the installer file after downloading to get started. The setup procedure is, once again, very easy to complete. CMake requires that you add it to your system’s PATH environment variable, so when prompted by the installer, choose that option.

Build Tools for Visual Studio Code
Next, we will download and install Build Tools for Visual Studio 2019.
This is a crucial tool for any user of the command line. Select “Build Tools for Visual Studio 2019” from the drop-down menu under “Tools for Visual Studio 2019” on the main download page.

There will be a download of a small programme that can be run on your computer. To start the installation, simply double-click this executable. When the installation process starts, a window will appear where you can select various settings. Go to “C++ Build Tools,” and then make sure “Windows 10 SDK” is selected in the right pane (important).
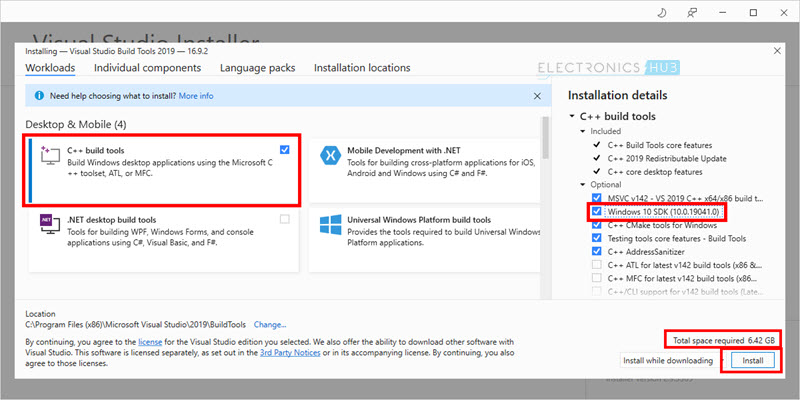
After making your selections, click the Install button. It’s a pretty massive set up (around 6.5 GB). Just relax with a cup of coffee while we finish the installation.

Installing Python
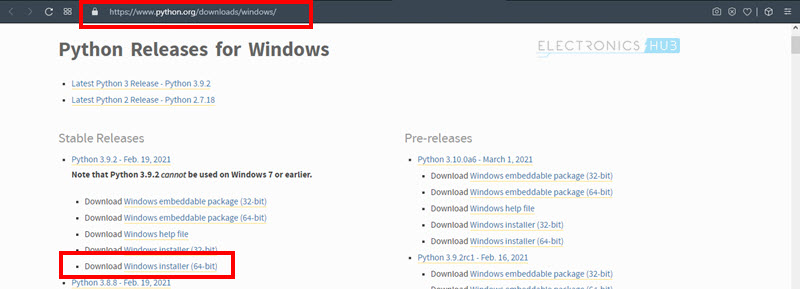
Installing Python on your PC is a prerequisite for using Visual Studio Code to programme a Raspberry Pi Pico. For the Windows Installer version of Python download, visit the official download page (64-bit). This guide was written using Python 3.9.2, the most recent stable release at the time of this writing.
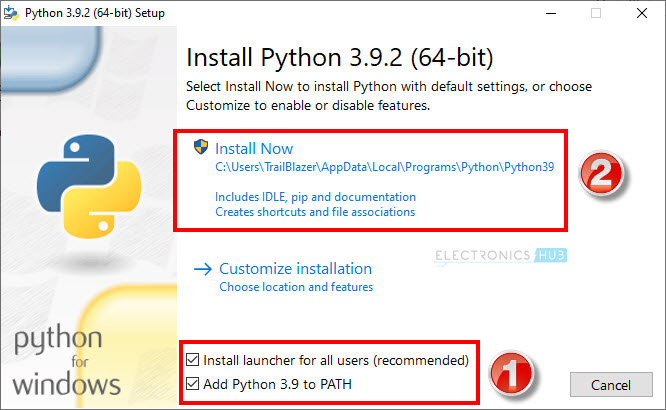
To begin the installation process, I simply double-clicked the executable file (named “python-3.9.2-amd64” in my case). There’s a “Install Now” button right there on the first screen. But before you do, make sure the “Add Python 3.9 to PATH” box at the very bottom is checked. Awaiting your click on the “Install Now” button.
A “Setup was successful” message will appear once Python has been installed successfully. After disabling the path length limit on the same screen, click the close button.

Git
Git is the final piece of infrastructure that must be set up. First, grab the “64-bit Git for Windows Setup” executable from the Git download page.

When prompted to choose an editor during the installation process for Git, do not select Syntax highlighting. When it came time to pick an editor, I went with Notepad++.

Once this is done, you’ll need to make a few crucial adjustments. All mandatory configuration options will be detailed below; all others can be safely left at their factory settings.
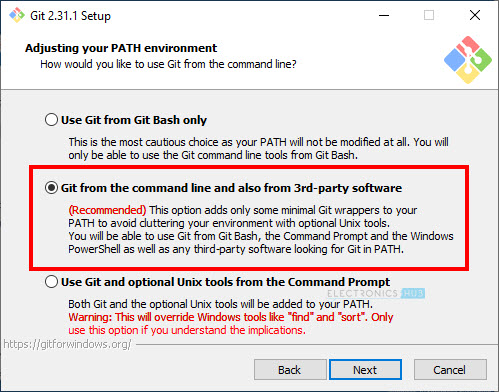
Pick the “Git from the command line and also from 3rd party software” option.
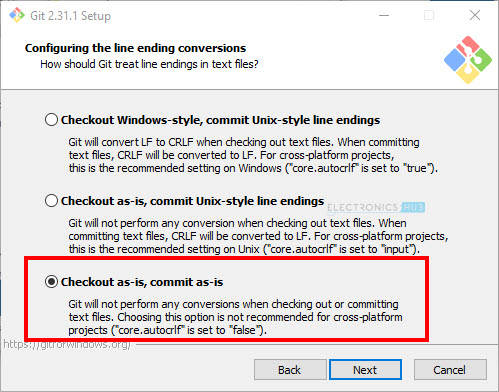
Then choose the option that reads “Checkout as-is, commit as-is.”
If you want Windows to open a console window by default, choose this option.

Install the programme by selecting the box labelled “Enable experimental support for pseudo consoles.”

Download Pico SDK and Examples
Now that we have the necessary software installed, we can get the official Raspberry Pi Pico SDK and the examples. On C:, I made a new directory that I simply titled “pico.” The SDK can be obtained from any available location.
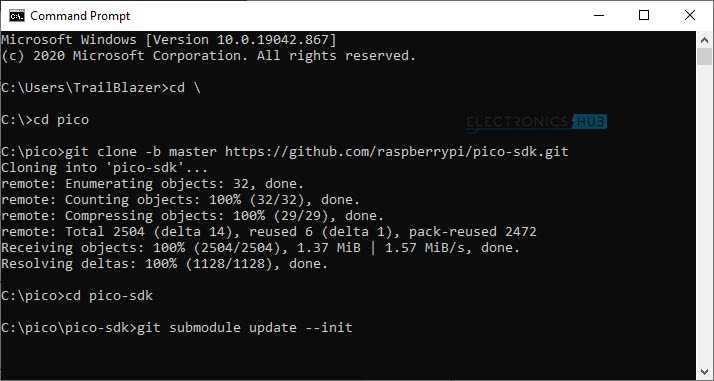
Launch the Windows command prompt and navigate to the location where you want to save the SDK and Examples (in my case, C:pico).
To begin, run this command to clone the ‘pico-sdk.
git clone -b master https://github.com/raspberrypi/pico-sdk.git

The tinyUSB submodule can be added by opening the ‘pico-sdk’ folder (important to use USB).
cd pico-sdk
git submodule update –init
Visit the previous directory and grab the ‘pico-examples’ file.
cd ..
git clone -b master https://github.com/raspberrypi/pico-examples.git

Programming Raspberry Pi Pico from Command Line
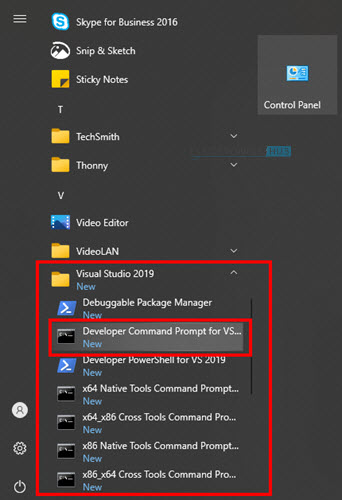
Let’s look at how to code the Raspberry Pi Pico for Windows’ Command Prompt to try out the tools and get our first build underway. To access the Developer Command Prompt for VS 2019, click the Start button, then type “Visual Studio 2019” into the search bar.
Navigate to the “pico” directory where you unzipped the SDK and examples. Use this command to set the location of the SDK.
cd \
cd pico
setx PICO_SDK_PATH “..\..\pico-sdk”
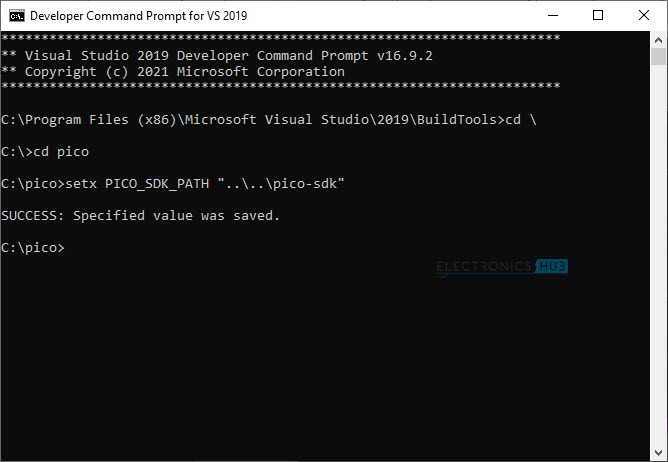
Exit the command prompt (by typing exit) once the path has been set, and then launch the same command prompt again (Developer Command Prompt for VS 2019). The command prompt’s path will then be properly set.
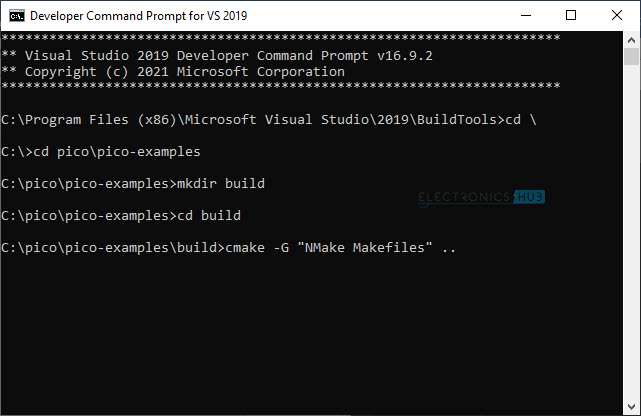
Make a new directory called “build” inside the pico folder, and navigate to it.

The Makefiles can now be constructed with CMake. Please execute this command:
cmake -G “NMake Makefiles” ..
After that, the nmake command can be used to construct the projects.
nmake
NOTE:To build all the projects, simply run the ‘nmake’ command, but be aware that this will take some time. Another option is to use the nmake command and specify the project you wish to build.

Navigate to the build folder for the desired project; this is where you’ll find the executable in various file formats (.elf,.uf2, etc.). The.uf2 file format can be used for a drag-and-drop upload to a Raspberry Pi Pico.
Installing Visual Studio Code in Windows
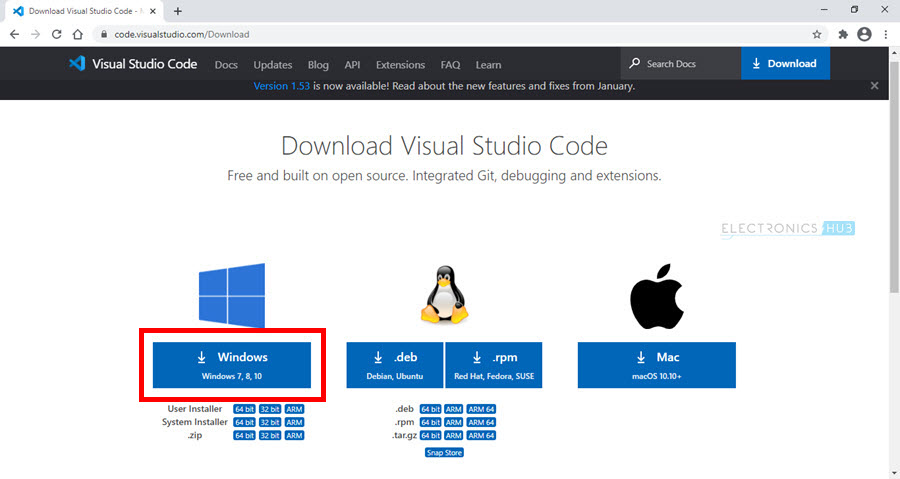
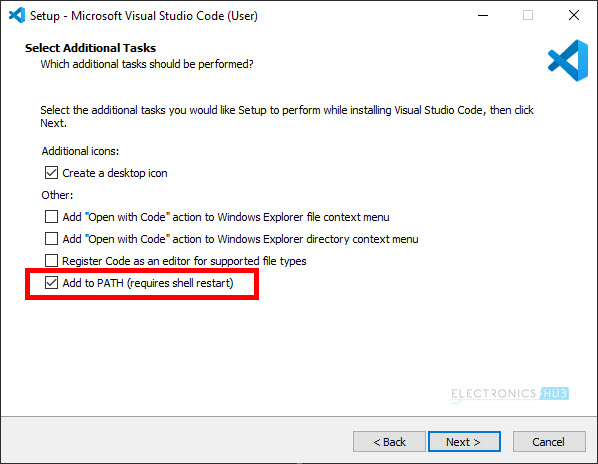
Let’s get Visual Studio Code set up on Windows so we can start programming a Raspberry Pi Pico. Click the “Windows” download button on the downloads page of Visual Studio Code. Clicking this link will start the download of the 64-bit setup programme.
Just double-click the installer to get started, and then follow the on-screen instructions. If prompted, select the option to “Add to PATH.”
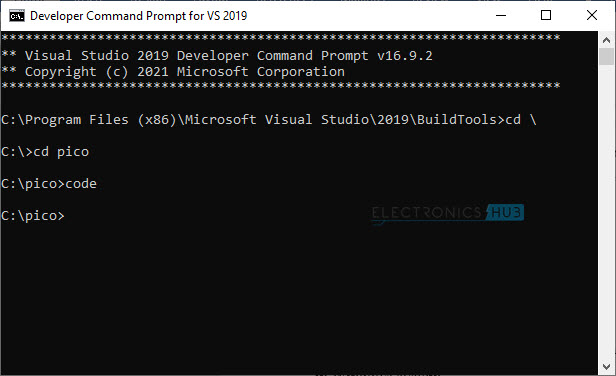
The rest of the steps are very basic. Wait to start the Visual Code. Once Visual Studio 2019 is installed, launch the “Developer Command Prompt for VS 2019” as described above.
When you type “code” and press enter, Visual Studio Code will open with the appropriate settings and environment variables.
Please take note that this is the correct way to launch Visual Studio Code in Windows in order to programme a Raspberry Pi Pico. There is a conflict in the text editor, so you must first remove the files from the build folder.
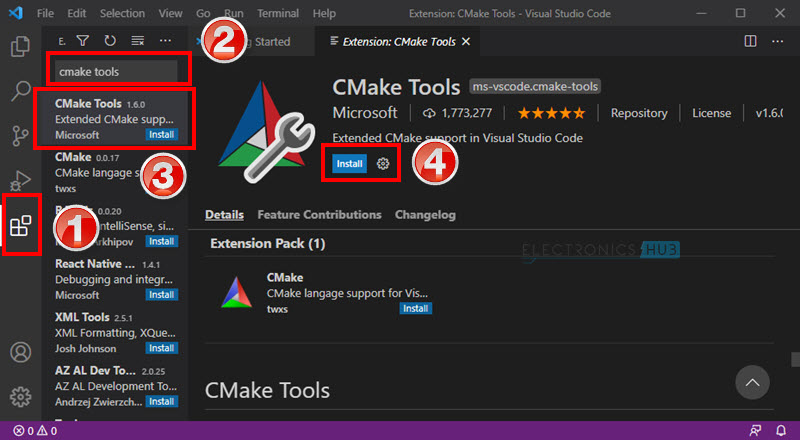
After launching Visual Studio Code, the first order of business is to add the CMake extension. To find the CMake Tools, go to the ‘Extensions’ menu on the left. Select CMake Tools from the list of results, and then click “Install.”
Now, in the bottom left, click the Settings icon.

To configure CMake, expand the ‘Extensions’ menu and click the corresponding button. Select ‘Cmake: Configure Environment’ on the right, and then enter ‘PICO SDK PATH’ for the Item and ‘….pico-sdk’ for the Values.

Keep going down until you reach ” Cmake : Generator ” Copy and paste “NMake Makefiles” into the box. The Settings window can be closed.

Now, in the top left corner, click the ‘Explorer’ tab, and then choose the ‘Open Folder’ option.
Browse to c:\pico\pico-examples\ and select the folder.

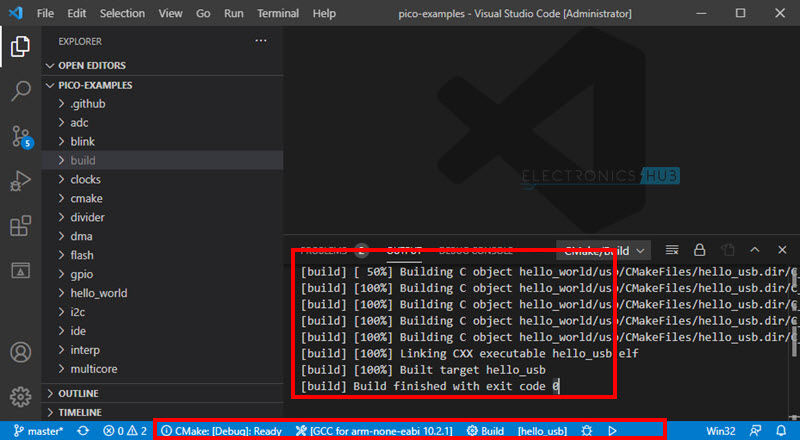
CMake will ask you to configure the project. Select yes and then choose “ GCC for arm-none-eabi ” option.

The ‘No Kit Selected’ option can be found in the blue status bar at the bottom of the page if you accidentally skipped this step.

After this, the CMake tool will begin generating Makefiles for each project. Select “Build” from the blue status bar at the bottom of the screen to compile your projects. Choose the target project to build to next to the “Build” button.
The process of transferring code to a Raspberry Pi Pico remains unchanged.
Conclusion
I hope all of you had understand the basics of Programming Raspberry Pi Pico in Windows. We MATHA ELECTRONICS will be back soon with more informative blogs.