
All About BBC micro: bit v2?
If you are looking to start programming or would like an exciting device to get young people interested in coding – then the BBC micro:bit v2 is perfect for you! Created by the BBC working in partnership with other brands, the micro:bit is a small, programmable computer that has been designed to inspire children and young people to learn about programming and electronics in a practical and fun way.
What is BBC micro:bit v2?
The BBC micro:bit v2 is a mini-computer designed to make coding enjoyable and simple to learn. The micro:bit v2 is totally programmable, allowing you to effortlessly realise your ideas! Making games, music, and even manipulating robots are all possibilities. The micro:bit has cool hardware including a 25 LED display, buttons, built-in speakers, Bluetooth connection, and temperature, motion, and light sensors.
The micro:bit is a pocket-sized computer meant to encourage children’s critical thinking and creativity. The micro:bit gadget is a multipurpose instrument that may be designed to perform in a variety of ways. Children are encouraged to experiment with their ideas by utilizing real code and computational thinking with the micro:bit.
Key Features
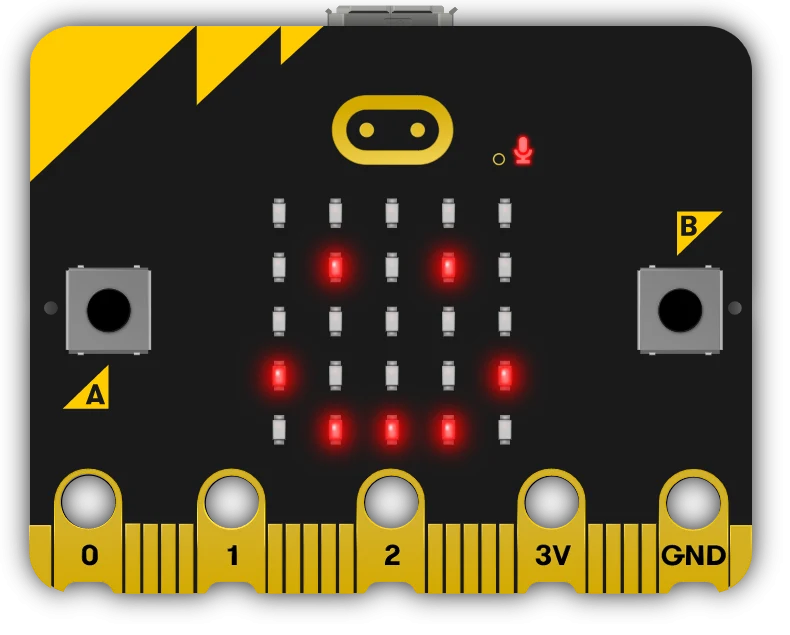
- 25 LED matrix on the board where you can scroll messages or display numbers
- Accelerometer to detect movement or tilting
- Compass
- Bluetooth connection to interact with the internet or other devices
- 2 user input buttons
- Micro USB connection to use with PC for programming
- Port for a battery pack
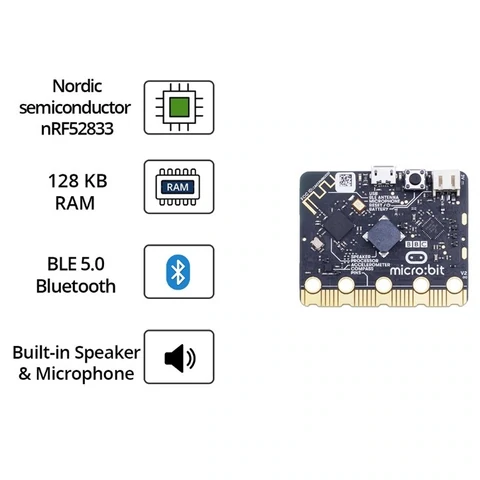
- ARM Cortex-M4 CPU
- Built-in speaker and microphone
- 20 pin edge connector along the bottom of the board
- Capacitive touch sensor
- Can be programmed using C++, MakeCode, Python, Scratch
Product Overview:
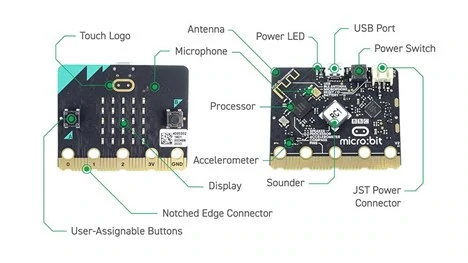
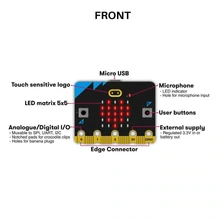
This single board computer, measuring just 4cm x 5cm, contains an excellent ARM Cortex m4 CPU and 512KB of flash, making it a formidable tiny gadget. The micro:bit is available in four different colours and features a variety of independently programmable inputs and outputs, including a 5×5 LED matrix display, buttons, speakers, and a microphone. The micro:bit also has a temperature sensor, accelerometer, touch sensitive logo, and a sleep/off mode built in.
The quantity of hardware on each board, which is half the size of a credit card, will astound you, including 25 red LED lights that can flash messages. There are two programmable tactile buttons and a touch sensitive logo for controlling games or pausing and skipping tracks on a playlist. The micro:bit can detect motion and tell you which way you’re going. It can also communicate with other devices and the Internet using Bluetooth Low Energy (BLE 5.0).
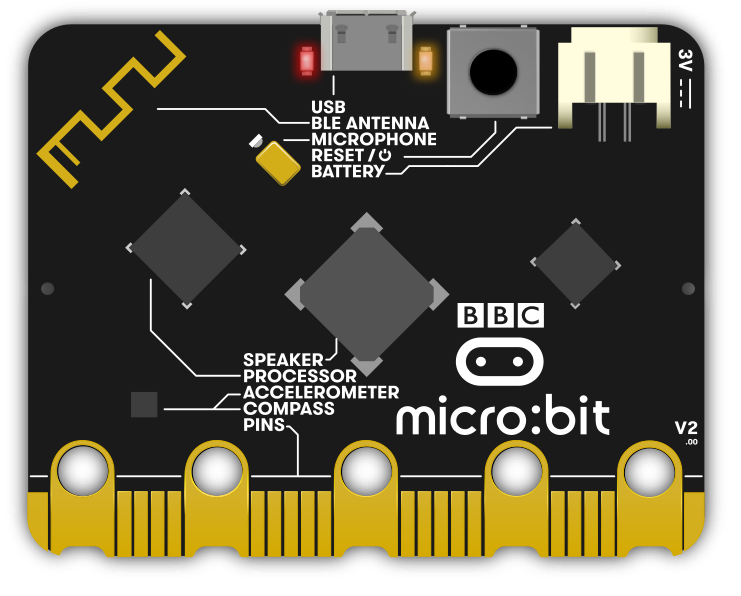
A closer look at the front of the board reveals a 5×5 LED array that may be used as a light sensor, a little screen to draw on and show words, numbers, and other information, a microphone input with LED indication, two programmable tactile buttons, and the touch sensitive logo! The micro:brains bit’s are located on the back of the board, and include a 64 MHz ARM Cortex-M4 microcontroller with FPU, 512KB Flash, 128KB RAM, and a built-in temperature sensor.
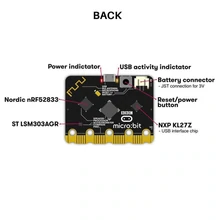
The rear of the micro:bit also has an accelerometer, compass, MEMS microphone, speaker, and Bluetooth Smart antenna, as well as a microUSB and two-pin JST connection for power. Finally, there are 25 gold-tabbed edge pins and five ring connections (three for digital/analog I/O, two for power and ground) at the bottom of the board for connecting external components. Tabs with wider holes that can be readily used with alligator clips are now notched for easy connection to rapidly prototype new components.
It is compatible with a variety of free online code editors made for various knowledge levels across a variety of programming languages, so you can choose something that works for how you want to study or teach. There are an infinite number of free projects, lesson ideas, and exercises to undertake, so there is no excuse not to begin your micro:bit journey now.
How to get started
The micro:bit is really simple to use. To get started, you don’t need a lot of sophisticated peripherals; all you need is a PC or mobile device to programme it on.
- Micro:bit v2
- Battery pack with 2 AAA batteries
- A computer, phone or tablet
- If you’re using a computer, a USB lead to connect your micro:bit
- Internet access code editors to programme your micro:bit
- For building and making projects with your micro:bit, some extra items that are great to have:
- Headphones
- Crocodile clip leads
- Conductive materials (such as aluminium foil and paper clips)
Once coded, the micro:bit will remain in the flash memory and can be executed as many times as required. When you wish to attempt a different project, you can re-program it; one programme can be held at a time.
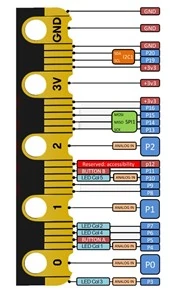
Microbit V2 on-board Pinout:
How to determine difference between micro:bit versions
There are a few simple ways to tell if you have the most recent board revision.
- On the back of the board, the Version number (V2) is plainly displayed in the bottom right corner.

- The label on the back of the device now specifies the MICROPHONE and SPEAKER, and the BLE ANTENNA is gold in colour.
- The Edge Connector includes convenient notches that allow you to use crocodile clips or conductive thread without it slipping between the pins.

- The micro:bit logo is now gold on the front of the gadget. This implies that it can function as a touch-sensitive input pin.

latest micro:bit

previous micro:bit
Conclusion:
Microbit v2 has the same form factor as the original, but with a few enhancements. It is well-designed to teach the next generation about sensors and programming.If you’re a parent who wishes to inspire your children’s interest in coding or electronics, here is the place to start. It features a block coding structure that a computer and even a phone can simply follow. They’ve made the documentation, tutorials, and setup so simple that even children aged 8 to 14 can get started right away. I always prefer micro:bit boards since they are small, simple to use, and inexpensive in comparison to the sensor and features they provide.