
This project’s primary goal is to automate toilet doors for individuals who are disabled or paraplegic. For those with disabilities, using the restroom can be a nightmare activity, with the majority of the difficulty coming from opening and closing the toilet door.

Therefore, the goal of this project is to create handicapped-accessible, automated toilets that are simple to use. This particular modified version of an electronic door lock operates on an Arduino Uno. I think this Arduino project will make it easier for people with disabilities to use restrooms on their own. Let’s examine this project and how it functions.
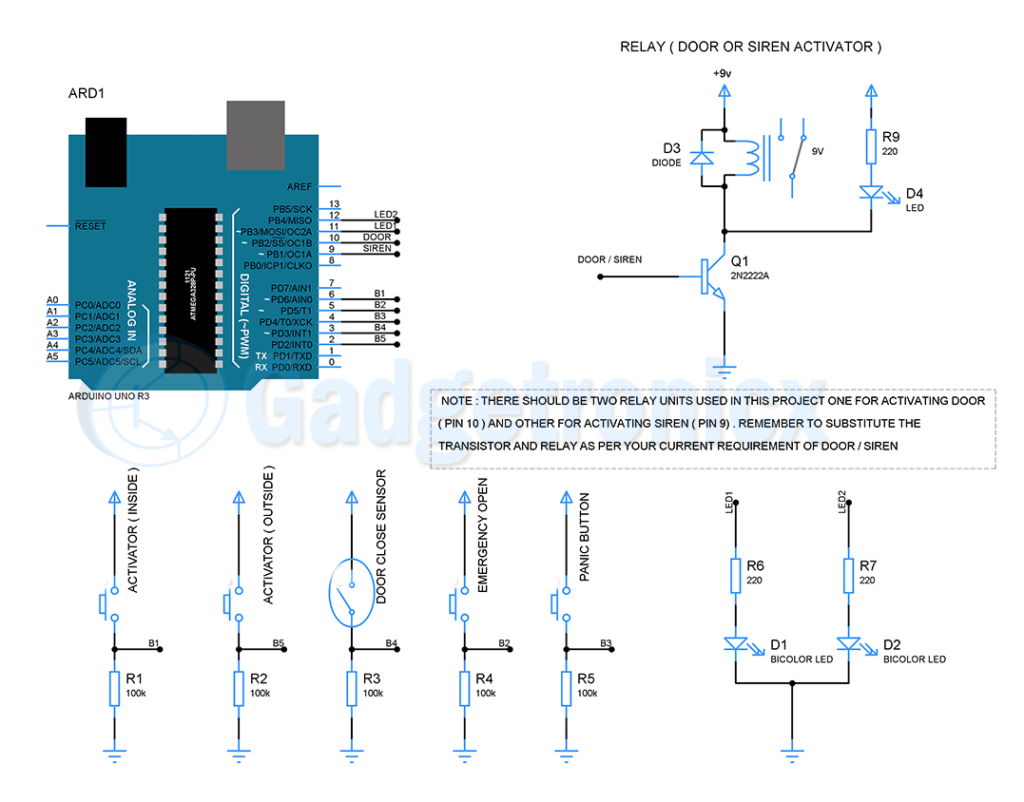
SCHEMATIC DIAGRAM:
INTERFACES INVOLVED IN THIS AUTO TOILET DOOR SYSTEM:
- Outside Activator:
To open the door, this interface is mounted outside the bathroom. Push buttons, no-touch magic switches, motion sensors, access badges, and cards are just a few examples of the interfaces you may use for this. As an alternative, you can use the remote buttons. This will be a straightforward push-button in my project.
- Facility Operator:
A mounted device that locks and unlocks doors within the facility. Push-button, no-touch magic switch, and access tags or cards are the only available options.
- Panic Device:
These are used to open the door and sound the alarm in case of emergency, providing access for the response. An emergency door release shatter glass unit is an option, as is an additional button on the remote or nearby the user inside the facility. When this option is selected a second time, the panic state is reset. The facility thereafter resumes its regular state of availability. This automatic toilet door opener system will have two panic outputs: timed and constant. Together, these can activate sirens and strobes, or they can connect to external building management systems, security panels, etc. Internally, the timer output can be changed from 5 to 60 seconds. Here, loud, high-power sirens are required, so you can make use of the extra relay unit connected to pin 9 of Arduino.
- Override:
To allow access for emergency personnel and facility maintenance professionals, this is positioned outside the building. The possibilities here include a remote button, a break-glass emergency door release unit, a key switch, or third-party solutions. It is crucial that only facility workers or emergency personnel get access to it in case of crisis.
- Prank Sensor:
This preventative measure prevents the facility from being set to a lock state while the gate is open. By doing this, pranksters won’t be able to change the door to lock status, exit the building before it closes, and lock others out. A reed switch will serve as a door lock sensor in this project.
- INDICATOR LED:
They are mounted inside and outside the building to display the restroom/toilet/bathroom status. The purpose of these indicators is to inform users of the present state of this toilet door opening device.
- GREEN – indicates that the space is available and empty
- RED – The facility is occupied and won’t open from the outside activator, according to the colour RED.
- RED/GREEN – Fast fading and flashing signals an emergency at the facility.
- ORANGE/GREEN – A pulse lasting one second signifies that the door has been left open by an override.
If the facility is empty, it cannot be placed in panic mode.
HOW IT WORKS:
The indicator light is green and you are outside. When the toilet door is activated, it opens for long enough for you to enter the facility with a wheelchair. There is a green indicator light and you are inside. When the internal button is pressed, the indicator light changes to red, signaling that the space is occupied. Thus, this stops the Outside Activator from opening the door.
After washing your hands, press the internal button or device. When the indicator light changes to green, the door will then be left open so that you can leave. So let’s look at some unexpected events. The door is locked, you’re inside, and you need assistance. Also, the light is RED. When the panic device is activated, the indicator lights go crazy, a siren may ring, lights may flash, and the door may open, allowing those who can help you entrance. Reactivate the panic device to restore regular operation and turn the facility’s status back to green.
Think about another situation where you are inside and require assistance. But even though the door is locked and the indicator is RED, you were still able to contact for assistance even though you couldn’t use the Panic Device. For help opening the door from outside, there is an override button or activator. However, only corresponding personnel should be able to use the Override button, and it should only be utilised in the situations specified above.
CODE:
| /* Paraplegic toilet automatic door controls code by Anthony Kenny */ // these constants won’t change const int InsideButton = 6; // inside push button const int Activator = 2; // remote, card reader, button etc. const int DoorClosed = 3; // mag reed switch to see if door is closed, door must not lock if open const int Panic = 4; // panic button const int EmergencyOpen = 5; // overide to open door const int RedLED = 11; // Toilet Occupied indicator const int GreenLED = 12; // Toilet Vacant indicator const int Open = 10; // Open Toilet const int Siren = 9; // Siren signal // Vaiables that will change int DoorState = 0; // Door leaf open/closed int ToiletState = 0; // Toilet Locked/Unlocked/Emergency int activate = 0; // Open Signals int panic = 0; // Panic button int Button = 0; // inside button int flipflop = 0; // flip flop to activate deactivate panic status long sirenruntime = 4700; // siren on time int LEDredbrightness = 0; // how bright the red LED is int LEDgreenbrightness = 255; // start brightness of green LED int REDfadeAmount = 5; // how many points to fade the red LED by int GREENfadeAmount = 0; // how many points to fade the green LED by int Overide = 0; // external overide int OverideState = 0; // overide status void setup() { // initialize inputs pinMode(InsideButton, INPUT); pinMode(Activator, INPUT); pinMode(DoorClosed, INPUT); pinMode(Panic, INPUT); pinMode(EmergencyOpen, INPUT); // initialize outputs pinMode(Siren, OUTPUT); pinMode(RedLED, OUTPUT); pinMode(GreenLED, OUTPUT); pinMode(Open, OUTPUT); Serial.begin(9600); // initialize serial communication for probing analogWrite(GreenLED, LEDgreenbrightness); //initial status } void loop() { /* Outside toilet activation */ activate = digitalRead(Activator); // read the activation signals input pins: // ToiletState = digitalRead(DoorClosed); // LockSignal = digitalRead(InsideButton); Button = digitalRead(InsideButton); // check inside button DoorState = digitalRead(DoorClosed); // is door closed panic = digitalRead(Panic); // is panic button pressed if (activate == HIGH) { // open door if activated, remove later if (ToiletState == LOW) { // if toilet unoccupied digitalWrite(Open, HIGH); // open door delay(1000); //so a short open pulse to operator digitalWrite(Open, LOW); // close door Serial.println(“opened”); // probe opened } } /* External Overide */ Overide = digitalRead(EmergencyOpen); // read emergency open signal if (Overide == HIGH) { // if overide is active if (OverideState == LOW) { // if door is not already over riden OverideState = 1; // set to overide status digitalWrite(Open, HIGH); // open door analogWrite(GreenLED, 255); // make leds orange analogWrite(RedLED, 100); delay(2000); // delay for push button signal } } Overide = digitalRead(EmergencyOpen); // read emergency open signal if (Overide == HIGH) { // if overide is active if (OverideState == HIGH) { // if door is not already over riden OverideState = 0; // set to overide status digitalWrite(Open, LOW); // open door analogWrite(RedLED, 0); // turn off red LED delay(2000); // delay for push button signal } } /* Inside toilet button */ if (Button == HIGH) { // if inside button pressed Serial.print(“Inside Button “); // probe that inside button is pressed Serial.println(Button); if (DoorState == LOW) { // if door is closed if (flipflop == LOW) { // check if not in emergency status if (ToiletState == LOW) { // if door is unlocked ToiletState = 1; // lock the door analogWrite(GreenLED, 0); // change LED from green to red analogWrite(RedLED, 255); Serial.print(“Toilet State “); // probe toilet state Serial.println(ToiletState); Serial.print(“Door State “); // probe Door State Serial.println(DoorState); delay(1000); // delay for push button signal } } } } // inside button pressed Button = digitalRead(InsideButton); // re-read inside button if (Button == HIGH) { // if button is pressed Serial.print(“Inside Button “); // probe that inside button is pressed Serial.println(Button); if (flipflop == LOW) { // check if not in emergency status if (DoorState == LOW) { // if door is closed if (ToiletState == HIGH) { // if door is locked ToiletState = 0; // unlock door analogWrite(GreenLED, 255); // set green LED to full analogWrite(RedLED, 0); // set red LED to off Serial.print(“Toilet State “); // probe toilet state Serial.println(ToiletState); Serial.print(“Door State “); // probe door State Serial.println(DoorState); digitalWrite(Open, HIGH); // open door delay(1000); digitalWrite(Open, LOW); // close door } } } } /* Panic activation */ int potValue = analogRead(A0); // declare and get pot value panic = digitalRead(Panic); // is panic button pressed if (panic == HIGH) { // check panic button if (flipflop == LOW) { // check if already in emergency state if (ToiletState == HIGH) { // check if the toilet is in use <locked> no need for emergency if toilet is not locked and occupied. flipflop = 1; // change to emergency state sirenruntime = (potValue * 12) + 600; // set siren run time digitalWrite(Open, HIGH); // open door Serial.println(“Emergency Opened”); // show door open on emergency delay(1000); // delay for button } } } panic = digitalRead(Panic); // is panic button pressed if (panic == HIGH) { // check panic button if (flipflop == HIGH); { // check if already in emergency state flipflop = 0; // change to safe state Serial.println(“door closed”); // show door closed after emergency digitalWrite(Open, LOW); // close door delay(1000); // delay for button ToiletState = 0; analogWrite(GreenLED, 255); // power up green LED analogWrite(RedLED, 0); // power down red LED Serial.print(“Toilet State “); // show toilet state Serial.println(ToiletState); Serial.print(“Door State “); // show Door State Serial.println(DoorState); digitalWrite(Siren, LOW); // switch off siren } } /* Siren and LEDs effects in emergency */ if (flipflop == HIGH) { // if in emergency state analogWrite(RedLED, LEDredbrightness); // set the brightness of RED LEDredbrightness = LEDredbrightness + REDfadeAmount; analogWrite(GreenLED, LEDgreenbrightness); // set the brightness of GREEN LEDgreenbrightness = LEDgreenbrightness + GREENfadeAmount; if (LEDredbrightness == 255) { // if red LED brightness is at 255 then REDfadeAmount = 0; // stop the red’s fade in and GREENfadeAmount = 5; // start the green’s fade in } if (LEDgreenbrightness == 255) { // if green LED brightness is at 255 then REDfadeAmount = -5; // start to fade out red and GREENfadeAmount = 0; // stop the green’s fade in } if (LEDredbrightness == 0) { // if red LED brightness is at 0 then REDfadeAmount = 0; // stop the red’s fade out and GREENfadeAmount = -5; // start to fade out green LEDredbrightness = 5; // set red brighness to five for the next loop < if (LEDredbrightness == 0) > } if (LEDgreenbrightness == 0) { // if green LED brightness is at 0 then REDfadeAmount = 5; // then start to fade in red and GREENfadeAmount = 0; // stop green’s fade out LEDgreenbrightness = 5; // set greens brighness to five for the next loop < if (LEDgreenbrightness == 0) > } delay(1); if (sirenruntime > 0) { // if time has not run out tone(13, 3000); // 3kHz to Piezo digitalWrite(Siren, HIGH); // siren is on sirenruntime = sirenruntime – 5; // siren decrement Serial.print(“siren run time “); // probe run time left Serial.println(sirenruntime); } if (sirenruntime <= 0) { // if sirentime is 0 or less noTone(13); // stop piezo digitalWrite(Siren, LOW); // stop siren } } } |
NOTE:
- You must construct two separate relay units, one for the door and the other for the siren. For the sake of simplicity, the circuit schematic only shows one relay unit.
- Since different activators and sirens function under different ratings, replace the transistor and relay according to your required current and voltage.
- Between the Arduino pins and the transistor base, add a bias resistor.
- The door activator mechanism or unit needs to be activated or deactivated utilizing the relay unit, which is outside the purview of this project article.