
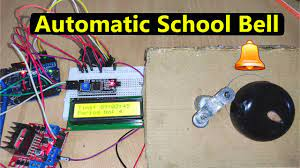
Nowadays, everything is mechanized, thus I believe it is only reasonable to automate the beloved school bell. In light of this, I decided to design and develop an Arduino-based automatic school bell system. Every day at a set hour, this system rings the school bell. The bell can be turned on manually with this project. This will allow the user the freedom to manually activate it as needed.
Benefits Of The Proposed System
You’ve all seen the electric bells used in colleges and schools to keep the schedule or timetable. However, these bells are manually operated, only sounding when the switch is pressed. We’ll use Arduino to create an automatic college bell project in this tutorial. These manual bells have the significant drawback that someone must be there to hit the switch in accordance with the time. So occasionally it causes delays and throws off the schedule. For this project, an Arduino UNO microcontroller and a 16*2 LCD are used. You may program it to automatically ring using the schedule.
Schematic Design Of Automatic School Bell System
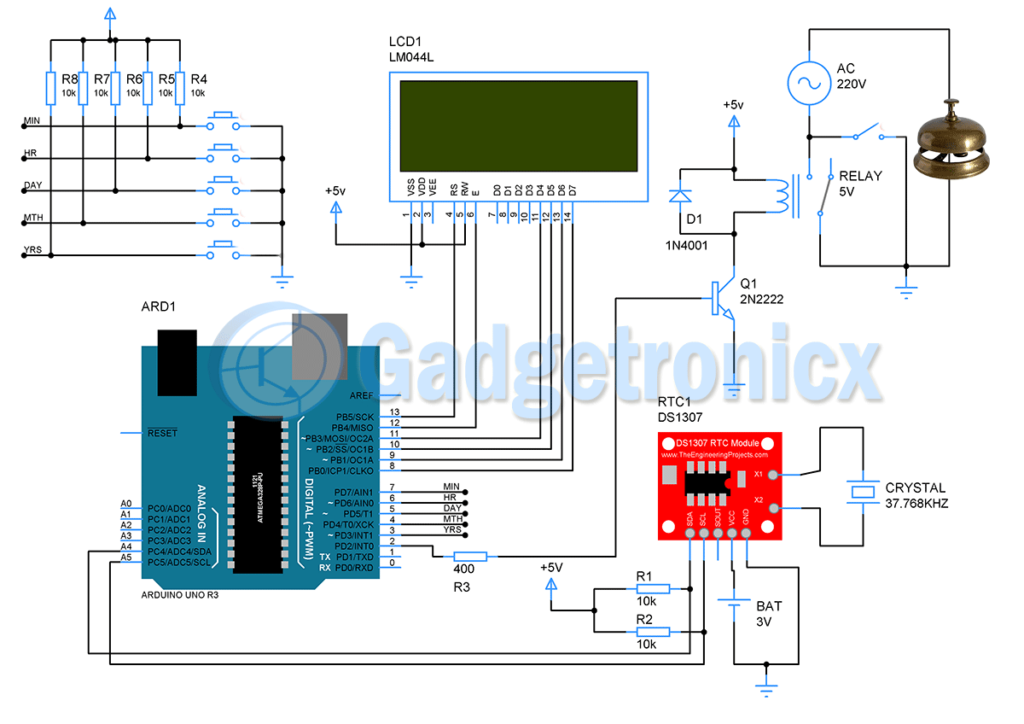
DS1307 RTC MODULE:
Many embedded applications employ the DS1307 real-time clock chip to add real-time to the system. Timers must use RTC chips because timing produced by microcontroller delays is not as accurate as real-time for time-sensitive applications like alarms. To give real-time input, this RTC chip will connect to Arduino utilizing the I2C communication protocol. This real-time input can be used by Arduino to carry out the required action, in this case, the ringing of the school bell.

Features:
- DS1307 I2C real-time clock chip (RTC)
- Available in 8-pin DIP or SOIC
- Accessed via I2C protocol
- AT24C32 32K I2C EEPROM memory
- Bidirectional I2C interface.
- Hour:Minutes: Seconds AM/PM.
- Day Month, Date – Year.
- DS1307-based RTC with LIR2032 battery.
- 1Hz output pin.
- 56-byte non-volatile RAM for data storage
- 56 Bytes of Non-volatile memory for the user
- The DS1307 is accessed via the I2C protocol.
- Consumes less than 500nA in battery backup mode with oscillator running
- Dimension: 27mm * 28mm * 8.4mm
16X2 LCD
The messages asking for time-table input are displayed on the 16X2 LCD display. By connecting its data pins to the Arduino board’s pins 3 through 6, it is connected to the board. The pins 13 and 12 of the Arduino Mega are used to connect the LCD’s RS and E pins, respectively. The LCD’s RW pin is grounded.

Working Of Automatic Bell Project
Real-time clock module DS1307 is where this automatic school bell system’s operation begins. This module monitors and provides real-time data to Arduino. Arduino will commonly obtain the time and date values from this chip using the polling procedure. Additionally, the user has five button inputs that they may utilize to change the RTC chip’s hours, minutes, date, month, and year settings. The corresponding values will change as these buttons are continuously toggled, and they will be recorded in the RTC chip.A relay that is operated by a transistor switch is used to trigger the automatic bell timer. The transistor switch is absolutely essential because Arduino lacks the power to directly operate the relay. When the relay is turned OFF, adding a flywheel diode D1 will protect the rest of the circuit.
CODE:
You need to install two Arduino libraries for this to work – DS1307 library and Time library .The code for the above work is given below.
| #include <LiquidCrystal.h> #include <TimeLib.h>#include <DS1307RTC.h> #include <Wire.h> LiquidCrystal lcd(13,12,11,10,9,8); /* lcd pinouts initialising */ int datetime[7]; /* stores the Time and date values */ /* setting up the input pins */ //int Hour, Min, Sec,Day,Month, Year;tmElements_t tm; void setup(){ for(int i=3;i<8;i++) { pinMode(i,INPUT); } pinMode(2,OUTPUT); /* pin for the bell */ lcd.begin(20,2); /* powering up the lcd */ tm.Hour=9; tm.Minute=0; tm.Second=0; tm.Day = 1; tm.Month=1; tm.Year = 20; //RTC.set(19,3,19,0,9,59,50);//d,m,y,sem,h,m,s – sets the time and date } // this will run forever till you die or till power goes off #include <LiquidCrystal.h> #include <TimeLib.h> #include <DS1307RTC.h> #include <Wire.h> LiquidCrystal lcd(13,12,11,10,9,8); /* lcd pinouts initialising */ int datetime[7]; /* stores the Time and date values */ /* setting up the input pins */ //int Hour, Min, Sec,Day,Month, Year; tmElements_t tm; void setup() { for(int i=3;i<8;i++) { pinMode(i,INPUT); } pinMode(2,OUTPUT); /* pin for the bell */ lcd.begin(20,2); /* powering up the lcd */ tm.Hour=9; tm.Minute=0; tm.Second=0; tm.Day = 1; tm.Month=1; tm.Year = 20; //RTC.set(19,3,19,0,9,59,50);//d,m,y,sem,h,m,s – sets the time and date } // this will run forever till you die or till power goes off void loop() { //DS1307.getDate(datetime); /* get date */ setSyncProvider(RTC.get); lcd.setCursor(0,1); /* move the cursor down */ lcd.print(“Time: “); Print(tm.Hour); /* print hour on the lcd */ lcd.print(“:”); Print(tm.Minute); /* print minute */ lcd.print(“:”); Print(tm.Second); /* print seconds */ lcd.setCursor(0,0); /* move cursor back ontop */ lcd.print(“Date: “); Print(tm.Day); /* day */ lcd.print(“/”); Print(tm.Month); /* month */ lcd.print(“/”); Print(tm.Year); /* add 20 to it making it 2019 */ Print(datetime[0]); /* Print Year */ /* validating minutes, seconds and months for LCD printing and to avoid errors */ if(digitalRead(7)) { tm.Minute++; if(tm.Minute>59) tm.Minute=0; /* if minute is 59 */ RTC.set(tm.Minute); while(digitalRead(7)); } if(digitalRead(6)) { tm.Hour++; if(tm.Hour>23) tm.Hour=0; /* if hour has reached 24, making it 24 hours max */ RTC.set(tm.Hour); while(digitalRead(6)); } if(digitalRead(5)) { tm.Day++; if(tm.Day>28&&tm.Month==2) tm.Day=1; /* Setting the days in a month */ else if(tm.Day>30&&(tm.Month==4||tm.Month==6||tm.Month==9||tm.Month==11)) tm.Day=1; else if(tm.Day>31) tm.Day=1; RTC.set(tm.Day); /* update the date and time */ while(digitalRead(5)); } if(digitalRead(4)) { tm.Month++; if(tm.Month>12) tm.Month=1; /* if 12 months reached */ RTC.set(tm.Month); /* update the date and time */ while(digitalRead(4)); } if(digitalRead(3)) { tm.Year++; if(tm.Year>99) tm.Year=0; /* Years */ RTC.set(tm.Year); /* update the date and time */ while(digitalRead(3)); } /* give it some time */ delay(5); /* checking the time to sound the bell */ if(tm.Hour==10 && tm.Second==00) { digitalWrite(2, HIGH); /* sound the bell */ delay(10000); /* let it ring for 10 seconds */ digitalWrite(2, LOW); /* mute the bell */ } if(tm.Hour==11 && tm.Second==00) { digitalWrite(2, HIGH); /* sound the bell */ delay(10000); /* let it ring for 10 seconds */ digitalWrite(2, LOW); /* mute the bell */ } if(tm.Hour==12 && tm.Second==00) { digitalWrite(2, HIGH); /* sound the bell */ delay(10000); /* let it ring for 10 seconds */ digitalWrite(2, LOW); /* mute the bell */ } /*Repeat the above four lines of code with altered Hours and Minute values to make the bell ring for more time periods */ } /* convert array to a value that can be displayed on the LCD */ void Print(int number) { lcd.print(number/10); lcd.print(number%10); } |
NOTE:
- You must check the electric bell’s current rating before selecting the relay and switching transistor.
- Keep this device hidden and only allow authorized people to use it.
- The four lines of code from lines 84 to 89 should be repeated and used for longer periods of time with different hours and minutes values.