
ESP32 DHT11 Tutorial | DHT11 Humidity Temperature Sensor with ESP32
In this tutorial, we’ll interface DHT11 with ESP32 DevKit. DHT11 and DHT22 are the best sensors for an ESP32-based Web-based temperature and humidity monitoring system. Learn how ESP32 DHT11 Humidity and Temperature Sensor works, set up Arduino IDE, and show humidity and temperature on an LCD. You can also construct a basic ESP32 Web Server that displays DHT11 humidity and temperature.

In a few of our earlier projects, we used the DHT11 Temperature and Humidity Sensor along with the Arduino, Raspberry Pi, ESP8266, and STM32F103C8T6. A resistive type humidity sensor, an NTC type temperature sensor, and an 8-bit microcontroller make up the digital humidity and temperature sensor DHT11.
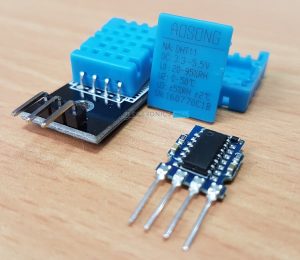
It can measure temperatures between 0°C and 500°C as well as relative humidity between 20 and 80 percent. The DHT11 Sensor’s microcontroller handles all ADC-related tasks and transmits digital data over a single wire.
Additionally, a cable length of up to 20 metres is possible for the DHT11 Temperature and Humidity Sensor. This implies that a wired Sensor system that can reach far areas can be simply implemented.
Pin Diagram and Pin Description of DHT11

| Pin of DTH11 | Description |
| VCC | Power Supply (3V to 5.5V) |
| DATA | Input / Output Data. Must be pulled HIGH. |
| NC | Not Connected |
| GND | Ground |
Decoding Data from DHT11
In the Arduino DHT11 Tutorial, I went into great detail on the appearance of the data from the DHT11 Sensor and how to extract it without the use of a library. If you are building DHT11 Sensor drivers for any other microcontroller, this is incredibly helpful.
The output of the DHT11 is a 40-bit data that is broken down into 8-bit relative humidity integer data, 8-bit relative humidity decimal data, 8-bit temperature integer data, 8-bit temperature decimal data, and 8-bit checksum. I won’t go into detail here.

ESP32 DHT11 Interface
After learning a little bit more about the DHT11 humidity and temperature sensor, let’s move on to learning how to connect the DHT11 to the ESP32. You must first keep in mind that DHT is a digital sensor (with an internal microcontroller performing the data acquisition and ADC conversion).
The second crucial point to keep in mind is that communication only works over a single wire. This means that we only need one wire for effective communication and that we may utilise any Digital GPIO Pin of the ESP32 to send and receive data to and from the DHT11.
Components Required
- ESP32 DevKit Development Board
- DHT11 Humidity and Temperature Sensor (Sensor or Module)
- 1 KΩ Pullup Resistor
- 16×2 LCD
- PCF8574 I2C LCD Module
- Breadboard
- Connecting Wires
- Micro USB Cable
NOTE: I purchased a DHT11 module with a 1 K pullup resistor already attached to the data line. This pull-up resistor is crucial if only the sensor is being used. The manufacturer recommends a 5 K pullup.
Circuit Diagram
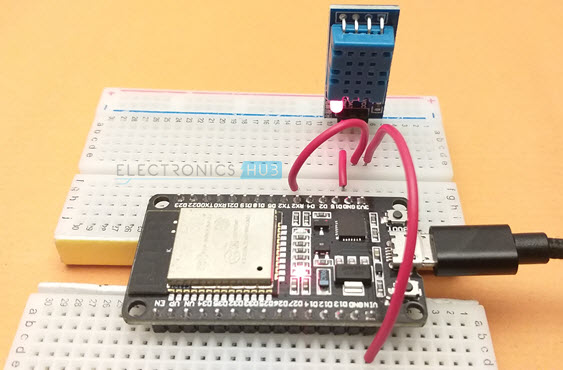
The connections between the ESP32 and the DHT11 are displayed in the next picture. The VCC of the DHT11 is first linked to the VIN of the ESP32 Board.
NOTE: The power supply range for the DHT11 is 3 V to 5.5 V. Therefore, you may also power the DHT11 with a 3.3V supply from the ESP32 Board.
The DATA pin is next. You should pull this pin HIGH. There is no need for me to make any extra connections because I already have a module attached with a 1 K Pullup. If you are only utilising the DHT11 Sensor, add a 4.7 K Resistor between the Data Pin and the ESP32’s VIN (or 3.3V) pin.
NOTE: The data pin’s pullup voltage ranges from 3 V to 5.5 V.
The Data pin is currently attached to ESP32’s GPIO 16, which is marked as RX2 on the ESP32 DevKit Board.
The third pin has no connections whatsoever. The GND pin is then linked to one of the ESP32’s GND pins.

Preparing Arduino IDE
A few libraries must be downloaded in order for the ESP32 and DHT11 Sensor to communicate effectively. The primary DHT11 Sensor Library is first. In the Arduino IDE, select Tools -> Manage Libraries…
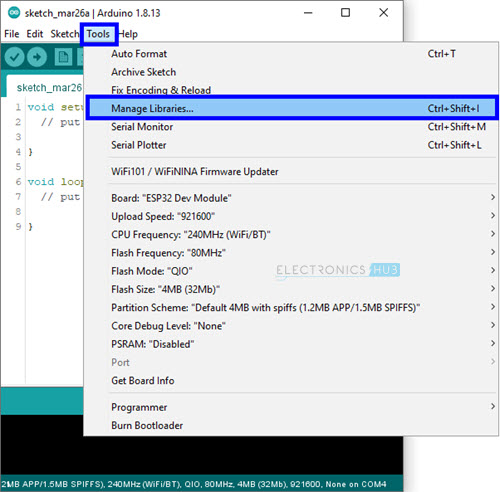
Type “dht” into the search box. Install the Adafruit “DHT sensor library” after navigating the menus.

The following library is related to the Adafruit device itself. Install the “Adafruit United Sensor” library by searching for “adafruit unified” and scrolling down.

Displaying Humidity and Temperature on Serial Monitor
We will now examine how to read the humidity and temperature data from the DHT11 Sensor using the ESP32 and display the result on the Serial Monitor after establishing the right connections and installing the required libraries as indicated before.
Code
I created a simple piece of code that would give the DHT11 Sensor a pin, set it up, and read the sensor’s temperature and humidity readings.
I just printed the temperature data in percent for Humidity and degree Celsius for temperature on the serial monitor to see the outcome.
| #include “DHT.h” | |
| #define DHT11PIN 16 | |
| DHT dht(DHT11PIN, DHT11); | |
| void setup() | |
| { | |
| Serial.begin(115200); | |
| /* Start the DHT11 Sensor */ | |
| dht.begin(); | |
| } | |
| void loop() | |
| { | |
| float humi = dht.readHumidity(); | |
| float temp = dht.readTemperature(); | |
| Serial.print(“Temperature: “); | |
| Serial.print(temp); | |
| Serial.print(“ºC “); | |
| Serial.print(“Humidity: “); | |
| Serial.println(humi); | |
| delay(1000); | |
| } |
The screenshot of the Serial Monitor, which continuously prints the temperature and humidity readings every three seconds, is shown in the following image.

ESP32 DHT11 with I2C LCD
Just for testing the connections and the code itself, displaying humidity and temperature information from a DHT11 sensor on a serial monitor can be helpful. You must need a display module of some kind (OLED, 162 Character LCD, Nokia 5110 LCD, graphical LCD, etc.) to view the humidity and temperature measurements in order to create a useful “Embedded System” application.
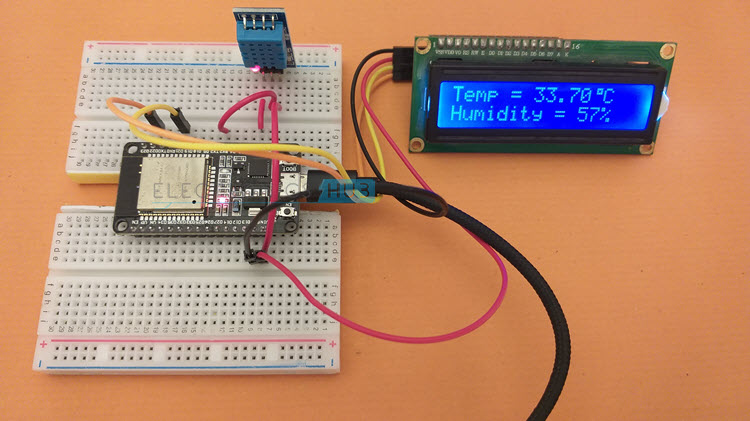
To display the temperature values from the ESP32 DHT11 Interface, I combined a normal 162 Character LCD Display Module with a PCF8574 I2C LCD Module.
I created a specific guide on using an I2C LCD with the ESP32. For further details, see that tutorial. In that lesson, I also covered the required libraries that you must download in order to effectively connect an I2C LCD to an ESP32.
NOTE: In that tutorial, I also covered how to find the I2C LCD module’s slave address. This action is crucial.
Circuit Diagram
Two further parts are needed: a 162 LCD display and an I2C LCD module (based on PCF8574). Connect the I2C LCD Module to the 162 LCD Display’s back. Only four connections are necessary for the I2C LCD Module (two of them are for power and two are for data).
The accompanying circuit diagram shows every connection that must be made between the ESP32 and the I2C LCD Module as well as between the ESP32 and the DHT11 Humidity and Temperature Sensor.

Code
The ESP32 DHT11 Interface with I2C LCD code is fairly straightforward. The sensor’s initialization phase resembles the earlier code. The only additional code is for the LCD.
| #include “DHT.h” | |
| #include <Wire.h> | |
| #include <LiquidCrystal_I2C.h> | |
| #define DHT11PIN 16 | |
| DHT dht(DHT11PIN, DHT11); | |
| LiquidCrystal_I2C lcd(0x3F, 16, 2); | |
| byte degree_symbol[8] = | |
| { | |
| 0b00111, | |
| 0b00101, | |
| 0b00111, | |
| 0b00000, | |
| 0b00000, | |
| 0b00000, | |
| 0b00000, | |
| 0b00000 | |
| }; | |
| void setup() | |
| { | |
| /* Start the DHT11 Sensor */ | |
| dht.begin(); | |
| lcd.init(); | |
| lcd.backlight(); | |
| lcd.createChar(0, degree_symbol); | |
| lcd.setCursor(0,0); | |
| lcd.print(” DHT11 with “); | |
| lcd.setCursor(0,1); | |
| lcd.print(” ESP32 DevKit “); | |
| delay(2000); | |
| lcd.clear(); | |
| } | |
| void loop() | |
| { | |
| int humi = dht.readHumidity(); | |
| float temp = dht.readTemperature(); | |
| lcd.setCursor(0,0); | |
| lcd.print(“Temp = “); | |
| lcd.print(temp); | |
| lcd.write(0); | |
| lcd.print(“C”); | |
| lcd.setCursor(0,1); | |
| lcd.print(“Humidity = “); | |
| lcd.print(humi); | |
| lcd.print(“%”); | |
| delay(1000); | |
| } |
Conclusion
Hope this blog helps you to understand the Interfacing of DHT11 Humidity and Temperature Sensor with ESP32. We, MATHA ELECTRONICS will come back with more informative blogs.