
Touchless gestures are the new frontier in the world of human-machine interfaces. You can control a computer, microcontroller, robot, or another device by swiping your palm over a sensor. To open or close any app, start the music, answer calls, and so on, most phones now have a gesture control capability. This is a very useful function for saving time, and it also looks amazing to use gestures to control any gadget.

Today, we’ll go over the fundamentals of gesture sensors, including how they operate, how to connect a gesture sensor to an Arduino, and how to use gesture sensors to control objects. Isn’t it thrilling? So let’s get this party started!!
What are Gestures?
A Gesture is a movement made with a part of your body, most often your hands, to convey emotion or information. A gesture is a type of nonverbal communication in which a person’s visible bodily gestures can convey a message. It is possible to control activities without contacting the real equipment by detecting these movements.

Left, right, up, down, forward, backward, clockwise, anticlockwise, and waving are the movements that users can recognise in this situation. You can also add right-left, left-right, up-down, down-up, forward-backward, and backward-forward to the mix.
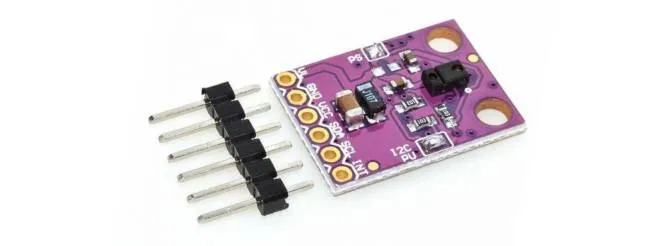
APDS9960 Proximity, Gesture, and Ambient Light Sensor
The APDS9960 is a sensor that recognizes six different gestures, detects proximity, measures the ambient light, and informs the presence of Red, Green, Blue, or Clear colors. It has UV and IR blocking filters built-in, as well as an I2C compliant interface and four independent photodiodes. It also identifies gestures by detecting infrared light waves reflected from an object and converting distance, velocity, and direction information into a digital value. The distance between the device and the user is measured using the same reflected IR photons. The ALS feature detects the presence of red, green, and blue light.
.
This APDS-9930 Gesture Sensor Digital Proximity And Ambient Light Sensor For Arduino is designed specifically to detect motion or human gesture within a detection range. The APDS-9930 provides an Ambient light sensor (ALS) compatible with the I2C interface and a proximity sensor with infrared LED in a single 8-pin package. The ambient light sensor uses a dual photodiode at a range of approx. 0.01 lux illumination. This module is widely used in applications where a motion/human gesture is detected from behind glass within a close range. Its high sensitivity allows the device to operate in the back of the dark glass.
Features:
- Working voltage:2.8-3.8V
- ALS, IR LED, and Proximity Detector in an Optical Module
- Approximates Human Eye Response
- Programmable Interrupt Function with Upper and Lower Threshold
- Programmable range from 2.7 ms to more than 8 seconds
- Up to 16-Bit Resolution
- High Sensitivity Operates Behind Darkened Glass
- Low Lux Performance at 0.01 lux;
- Ambient Light Sensing (ALS)
– Approximate human visual response
– Programmable interrupt capability with upper and lower thresholds
– Up to 16-bit resolution
– High sensitivity operation behind dark glass
– 0.01lux low lumen performance
- Proximity detection
– Fully calibrated to 100 mm detection
– Integrated infrared LED and synchronous LED driver
– Eliminates factory calibration of the proximity sensor
-Programmable wait timer
– Wait for state power consumption – 90μA typical
– Programmable range from 2.7 ms to more than 8 seconds
- I2C interface is compatible up to 400kHz (I2C fast mode) –
Pinout of APDS-9960 Gesture Sensor

| PIN | DESCRIPTION |
| VL | Optional power to the IR LED if PS jumper is disconnected. Must be 3.0 – 4.5V |
| GND | Connect to ground |
| VCC | Used to power the APDS-9960 sensor. Must be 2.4 – 3.6V |
| SDA | I2C data |
| SCL | I2C clock |
| INT | External interrupt pin. Active LOW on interrupt event |
On the front of the sensor, there are two soldered jumpers.
- PS – This jumper connects the sensor’s and the IR LED’s power supplies. You simply need to supply power to the VCC pin to power both the sensor and the IR LED when the jumper is closed (i.e. connected). If the jumper is open, however, power must be provided to both the VCC (2.4-3.6V) and VL (3.0 – 4.5V) pins independently. By default, this jumper is closed.
- I2C PU – A 3-way solder jumper for connecting and disconnecting I2C pull-up resistors. By default, this jumper is closed, indicating that both the SDA and SCL lines on the breakout board have attached pull-up resistors.
Components required
- Arduino Uno
- Power cable
- APDS-9960 Gesture Sensor
- Servo Motor
- Breadboard
- Dupont cables
Interfacing of Gesture Sensor With Arduino
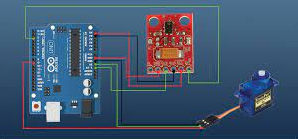
Here we are going to control a simple servo motor by using this gesture sensor.
- Connect the VCC of the sensor to the 3.3V of the Arduino.
- Connect the GND of the sensor to the GND of the Arduino.
- Connect SCL to the PIN A5 of the Arduino.
- Connect SDA to the PIN A4 Of the Arduino.
- Connect INT pin to PIN 2 of the Arduino.
- Connect the VCC of the servo motor to 5V of Arduino.
- Connect the GND of the servo motor to the GND of the Arduino.
- Connect the signal pin of the Servo motor to PIN 9 of the Arduino.
Code & Software
Before uploading this code to your Arduino, add the Spark Fun_APDS9960.h library to your system from the manage library section.
| #include <Wire.h> // added by RoboJax #include <Servo.h> #include <SparkFun_APDS9960.h> Servo myservo; // create servo object to control a servo // // Pins #define APDS9960_INT 2 // Needs to be an interrupt pin // Constants // Global Variables SparkFun_APDS9960 apds = SparkFun_APDS9960(); int isr_flag = 0; void setup() { myservo.attach(9); // attaches the servo on pin 9 to the servo object // Set interrupt pin as input pinMode(APDS9960_INT, INPUT); // Initialize Serial port Serial.begin(9600); Serial.println(); Serial.println(F(“——————————–“)); Serial.println(F(“SparkFun APDS-9960 – GestureTest”)); Serial.println(F(“——————————–“)); // Initialize interrupt service routine attachInterrupt(0, interruptRoutine, FALLING); // Initialize APDS-9960 (configure I2C and initial values) if ( apds.init() ) { Serial.println(F(“APDS-9960 initialization complete”)); } else { Serial.println(F(“Something went wrong during APDS-9960 init!”)); } // Start running the APDS-9960 gesture sensor engine if ( apds.enableGestureSensor(true) ) { Serial.println(F(“Gesture sensor is now running”)); } else { Serial.println(F(“Something went wrong during gesture sensor init!”)); } } void loop() { if( isr_flag == 1 ) { detachInterrupt(0); handleGesture(); isr_flag = 0; attachInterrupt(0, interruptRoutine, FALLING); } } void interruptRoutine() { isr_flag = 1; } void handleGesture() { if ( apds.isGestureAvailable() ) { switch ( apds.readGesture() ) { case DIR_UP: Serial.println(“UP”); break; case DIR_DOWN: Serial.println(“DOWN”); break; case DIR_LEFT: Serial.println(“LEFT”); myservo.write(180); // added by RoboJax break; case DIR_RIGHT: Serial.println(“RIGHT”); myservo.write(0); // added by RoboJax break; case DIR_NEAR: Serial.println(“NEAR”); break; case DIR_FAR: Serial.println(“FAR”); break; default: Serial.println(“NONE”); } } } |
Advantages of APDS-9960 RGB and Gesture Sensor
- It can easily replace the mouse and keyboard.
- It can navigate in a virtual environment.
- It can interact with the 3D world.
- No physical contact is needed.
Applications of APDS-9960
- The different functions provided by APDS-9960 are Ambient light sensing, Gesture detection, RGB color sensing, and Proximity sensing
- APDS-9960 is used in Touch screens of smartphones.
- For Mechanical switch replacement, this device is used.
- To calculate the color temperature, RGB sensing of APDS-9960 is used.
- For Adjustment of the backlight of TV, smartphones, etc…proximity sensing engine of APDS-9960 device is used.
- Gesture robotics also make use of different sensing engines present in this device.
- In medical equipment.
- LCD Displays.
- RGB monitors and for RGB rating APDS-9960 is used.
Conclusion:
In this article, we learned How To Make a simple Handwash Timer Using An Arduino.. Hope you all liked this. Will be back soon with more interesting blogs soon.