
Raspberry Pi is a credit card-sized development board that can be used by hackers, hobbyists, artists, and students for a variety of reasons. Although it is one of the most adaptable application boards, it is thought that it can only be utilized for a few common programming objectives, such as IoT or AI. In this article, we will discuss the top 10 issues a beginner could encounter while working with the Raspberry Pi. Here I am using a Raspberry Pi 3 and running the latest version of the Raspbian Stretch OS.

What is Raspberry Pi?

The Raspberry Pi 3 – Model B Original quad-core 1.2GHz 64Bit SoC with inbuilt WiFi and Bluetooth is the most recent product in the Raspberry Pi series. The Raspberry Pi 3 – Model B Original is a third-generation device with the same popular board shape as prior Raspberry Pi modules, but with a faster 1.2GHz 64Bit SoC, as well as inbuilt WiFi and Bluetooth.
The Raspberry Pi 3 Model B ARMv8 w/ 1GB RAM has the same functionality as the previous models, but with twice the RAM and a considerably faster processor. The Pi 3 includes two significant improvements. The first is a quad-core Broadcom BCM2837 64-bit ARMv8 processor from the next generation. This processor can run at speeds of up to 1.2GHz, compared to the Pi 2’s 900MHz. The addition of a built-in BCM43143 WiFi chip is the second upgrade, allowing the Pi 3 to go wifi without the need for extra peripherals. There will be no more WiFi adapters. With inbuilt Bluetooth Low Energy, the Raspberry Pi 3 is also an ideal IoT solution (BLE).
Features:
- Superior software implementation
- RAM: 1GB
- Processor: Broadcom BCM2837 chipset 1.2GHz Quad-Core ARM Cortex-A53 (64Bit)
- 802.11 b/g/n Wireless LAN and Bluetooth 4.1 (Bluetooth Classic and LE)
- Storage: SD/MMC/SDIO
- Power: 5V / 700mA~3A via micro USB
- 40-pin 2.54 mm (100 mil) expansion header: 2×20 strip
- Providing 27 GPIO pins as well as +3.3 V, +5 V, and GND supply lines
- 15-pin MIPI Camera Serial Interface (CSI-2)
- Display Serial Interface (DSI) 15-way flat flex cable connector with two data lanes and a clock lane
- Push/pull Micro SDIO
Major Issues faced by Raspberry Pi 3
1. Boot Issues
This could be as a result of quite a number of factors. It is usually indicated by the Red LED (power LED) being “ON” while the green (activity LED) is either “OFF” or permanently “on”.
Solution:
The green light on the Raspberry Pi represents software activity, so when it is blinking at intervals, it means the Pi is working. Thus, when it’s off or not blinking, the first place you should check is where the PI’s software is housed; the SD card slot. Ensure that the SD card is correctly inserted. If things do not change, check the SD card to be sure it was properly flashed with the OS and that the files on it are not corrupted.
In these cases, I normally format the SD card and re-flash it with the OS. If you have data on the SD card that you want to save, plug it into a computer and duplicate it before formatting it.
2. NOOBS OS freezes at the splash screen
One of the main reasons I dislike the Raspberry Pi NOOBS software is because of this. The Raspberry Pi’s boot process becomes stalled on the splash screen when this problem occurs.
Solution:
This can be fixed by formatting the SD card and copying the necessary noob files to it. If this fails, try a different SD card or the same SD card on a different Raspberry Pi. If the problem persists after trying everything, installing Raspbian stretch or another distribution may save you time.
3. Unable to Access the Pi over SSH
This is more of a security feature than a mistake incorporated into the Raspberry Pi stretch OS. For a Raspberry Pi running a new install of Rasbian Stretch, SSH communication is blocked.
Solution:
To fix this problem, go to the Raspberry Pi’s settings and enable SSH connectivity. Then, with the PI attached to a display, go to preferences and select Raspberry pi setup.

When the configuration window opens, select the radio button labeled, Enabled in front of SSH.

If you want to use the Raspberry Pi in headless mode, remove the SD card, put it in a PC, and then create an empty file named SSH, copy it to the SD card, and put it back in the Raspberry Pi. You should be able to connect to the PI through SSH immediately.
4. Board goes off intermittently
The Raspberry Pi reboots itself at random intervals, and the power LED may be out even when the board is turned on.
Solution:
This is mostly a power struggle. For example, the Raspberry Pi 3 requires a 5V, 2.5A power source to function correctly, thus anything less is likely to degrade its functionality. Although I have used 5V 1.5A on the Pi, performance is dependent on the task that the Pi is assigned. When this happens, check to see if you’re providing the Pi with enough juice to keep it running.
5. USB not Working
This error explains situations in which USB devices attached to the Raspberry Pi is either not recognized by the Pi or do not perform properly, as the tag says.
Solution:
A bunch of things could be wrong here.
- The Raspberry Pi is most likely underpowered, and hence unable to power the USB device. As a result, make sure your Pi is well-powered.
- The USB device could be defective. To ensure that everything is working properly, test it on your PC or another machine.
- Before turning on the Pi, connect your device to it. While this should not be a problem, the Pi may need to perform some initialization for USB devices like your keyboard and mouse, especially if you are using it for the first time.
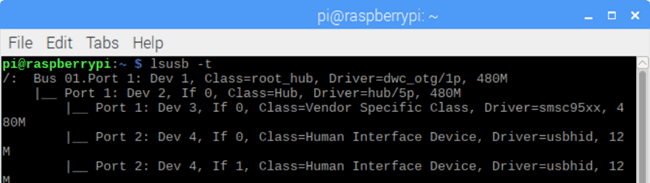
- There are times when the device connects to your Pi well, but it is simply unavailable for the action you are attempting to perform. Run the following command from the terminal to see if this is the case:
| lsusb –t |
This should give you a list of USB devices connected to your pi as shown in the image below.
- Driver Issues: Verify if the USB device is compatible with the Raspberry Pi’s Linux-based operating system. Here’s a list of USB devices that work with the Raspberry Pi from Elinux.org here.
- Make sure your pi is up to date. It is critical to execute an update or upgrade on the Raspberry Pi before beginning any new project. This is to guarantee that you are running compatible and up-to-date software on your Raspberry Pi. This could be the reason why hardware doesn’t respond to orders as quickly as it should.
5. Keyboard Character Display Errors
When a key on the screen differs from the one hit on the keyboard, particularly the # key. This problem is most often caused by the raspbian and NOOBS software’s default UK keyboard setting.
Solution:
You’ll need to adjust the configuration to your own keyboard or language to remedy this. This may be done by going to the raspberry pi’s config menu, selecting the keyboard configuration menu under the Internationalization menu, and scrolling down to select the keyboard layout that corresponds to the country of origin/language of your keyboard.
Go to options and pick the mouse and keyboard settings if you’re using a monitor.
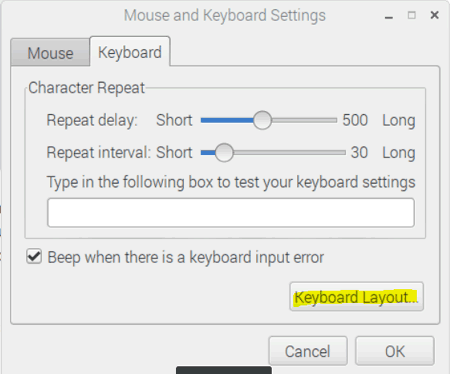
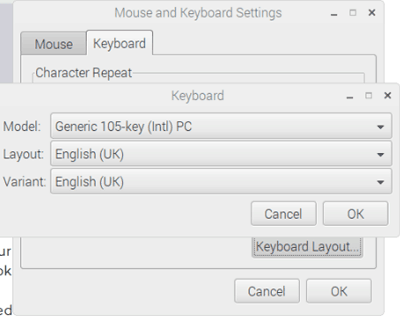
Select a keyboard layout and on the new window select your keyboard layout.
6. Trying to Change Password Hangs the Pi
When attempting to change the Raspberry Pi’s password, the device either hangs or refuses to do so (i.e. the new password is not registered).
Solution
This is one of the indicators that the Raspberry Pi isn’t getting enough energy from the attached power source, or that the power supply’s output is fluctuating. It’s as simple as changing the Raspberry Pi’s power supply or connecting it to a different port on your computer to fix this.
This is certainly not an exhaustive list of errors one could encounter while working with the Raspberry Pi, not sure we could fit that into a single article but this might give you a head start on the particular error shared and even similar errors.
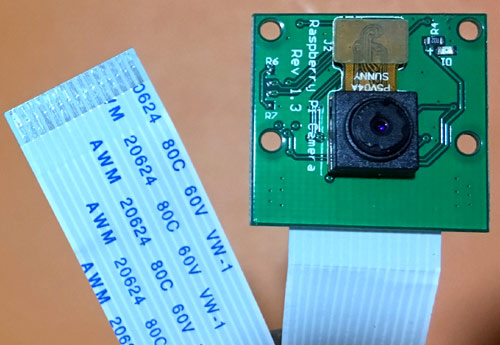
7. Raspberry Pi Camera not working
Most people expect the Raspberry Pi camera to operate right out of the box, and I’ve had to offer this simple remedy so many times that it probably merits a spot on this list.
The pi camera must be activated on the pi before it can be used. However, after the PI has been updated and upgraded, this should be done.
To do so, perform the update and upgrade commands first.
| Sudo apt-get updateSudo apt-get upgrade |
Followed by;
| Sudo raspi-config |
This will bring up the configuration window for the Raspberry Pi, as shown below.
Scroll to the bottom of the page, choose the camera and click Enable.
If you’re using a display, pick Raspberry Pi Configuration from the Preferences menu.
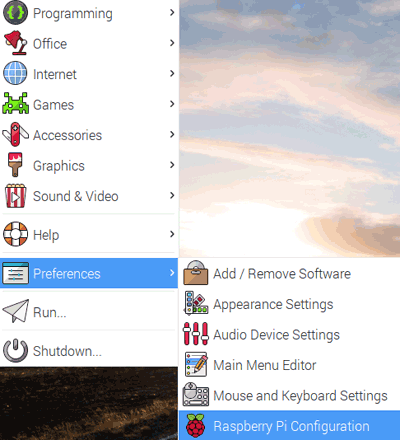
When the configuration window opens, check the Enabled radio button in front of the camera.

With this done, reboot the Pi. You should be able to access your feeds and photos now. If you’re still having trouble accessing the camera, consider using a new connecting strip and camera.
8. Raspberry Pi Camera Blank or Black Capture
This explains a situation in which the Raspberry Pi appears to capture a picture, but the image is blacked out.
Solution:
As previously said, many of the faults you will experience on the Raspberry Pi will be caused by a software update, and this error is no exception. When this happens, the first thing you should do is update and upgrade your Raspberry Pi to ensure you have the most up-to-date software and updates. After upgrading, restart your computer.
9. Ethernet On WiFi Off
Wi-Fi connectivity is disabled by default when an Ethernet cable is attached to the Raspberry Pi. This was most likely added as a security feature to prevent routing between the Wi-Fi and Ethernet ports on the Pi. This action is controlled by the ifplugd config file, which must be disabled if you want to use both Wi-Fi and Ethernet simultaneously.
To do this, run;
| sudo update-rc networking disable Or sudo apt-get purge ifplugd |
You should now be able to utilize both network choices at the same time, but keep in mind that the Pi will now operate like a router, which may present a security risk.
10. Raspberry Pi Not Working with HDMI Based Display
So you’ve managed to log in to your Pi via ssh, but you can’t seem to get it to work with an HDMI display? There are two things that need to be done;
- Make sure your HDMI cable is in good working order.
- Before powering your Raspberry Pi, connect the display to the Pi and select the relevant mode (HDMI or VGA) on the monitor.
- Before turning on the Pi, make sure your screen is switched on.
Conclusion
Hope this blog helps you to understand the top 10 common issues faced by Raspberry Pi 3 and its solutions in detail. Hope you enjoyed the project and learned something useful. We, MATHA ELECTRONICS will come back with more informative blogs.